The Crochet Maple Leaf Table Runner Pattern for Fall
Beginner Friendly
Perfect for those just starting their crochet journey, with clear instructions and simple techniques
Single-Day Project
A satisfying project you can complete in a single afternoon or evening.
Handmade Gift
A beautiful keepsake — free forever. Read online or print at home.
About This The Crochet Maple Leaf Table Runner Pattern for Fall
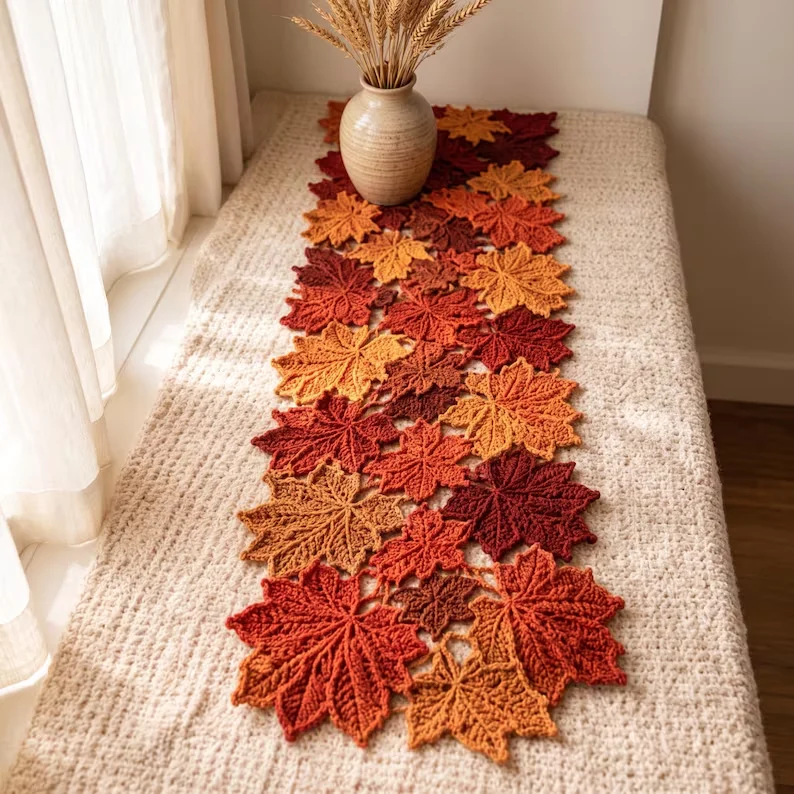
This crochet maple leaf table runner pattern turns twenty separate leaves into one long band of autumn color. Each leaf is worked from a magic ring into a five-pointed maple shape, then given a deeper outer color, a crocheted stem and embroidered veins. Laid out in a staggered column and stitched together where the tips touch, the leaves overlap just enough to look like they drifted onto your table.
The runner uses three leaf sizes and six autumn shades: rust, burnt orange, pumpkin, golden mustard, burgundy and chestnut brown. The shaping comes from a repeating five-section structure, so once you have made one leaf the rest go quickly. Expect about an hour per medium leaf, plus embroidery, blocking and assembly, for roughly 30 to 40 hours in total.
This is an advanced pattern. You will work from a magic ring, change colors mid-leaf, work decreases that form the valleys between lobes, embroider veins, and block and join twenty pieces into a single layout. It suits crocheters who are comfortable reading stitch counts and want a seasonal piece that looks bought, not homemade. You can also make a few leaves at a time and build the runner over several weeks.
Materials
- DK weight cotton or cotton-blend yarn, for small and medium leaves about 300 yd / 275 m total across all colors
- Worsted weight cotton or cotton-blend yarn, for large leaves about 160 yd / 145 m total across all colors
- Leaf colors rust, burnt orange, pumpkin, golden mustard, burgundy, chestnut brown
- Dark brown DK yarn for stems, about 25 yd / 23 m
- 3.5 mm crochet hook for DK leaves
- 4.5 mm crochet hook for worsted leaves
- Tapestry needle for embroidery and joining
- Stitch marker
- Rust-proof pins and foam blocking mats enough for one leaf at a time
- Spray bottle of water for wet blocking
- Scissors
Abbreviations
MRmagic ringchchainsl stslip stitchscsingle crochethdchalf double crochetdcdouble crochetsc2togsingle crochet two together (decrease)spspacest(s)stitch(es)*...*repeat the instructions between asterisks as directedMaple Leaf (make 8 small, 8 medium, 4 large)
Use Color A for the center and Color B for the outer rounds. Pair two neighboring shades for a soft gradient, or use the same color for both for a solid leaf. Work small and medium leaves in DK yarn with the 3.5 mm hook, and large leaves in worsted yarn with the 4.5 mm hook. All three sizes use the same rounds. Small leaves stop after Round 6, while medium and large leaves continue to Round 7.
- Round 1 (Color A): 10 sc in MR, join with a sl st to the first sc. Pull the ring tight. (10)
- Round 2: ch 1, 2 sc in each st around, join. (20)
- Round 3: ch 1, *2 sc in next st, sc in next 3 sts*, repeat 5 times total, join. (25)
- Round 4: ch 1, *sc in next st, hdc in next st, (dc, ch 2, dc) in next st, hdc in next st, sc in next st*, repeat 5 times total, join. Each of the five groups now reads sc, hdc, dc, ch-2 sp, dc, hdc, sc. (30 sts and 5 ch-2 sps)
- Fasten off Color A. Join Color B with a sl st in the first sc of Round 4.
- Round 5 (Color B): ch 1, *sc in sc, hdc in hdc, 2 dc in dc, (dc, ch 3, dc) in ch-2 sp, 2 dc in dc, hdc in hdc, sc in sc*, repeat 5 times total, join. Each group now has 10 sts with a ch-3 sp at its center. (50 sts and 5 ch-3 sps)
- Round 6: ch 1, skip the st you just joined into (the last sc2tog of this round will work into it), then *sc in next 4 sts, (2 sc, ch 2, 2 sc) in ch-3 sp, sc in next 4 sts, sc2tog over the next 2 sts*, repeat 5 times total. Work the last sc2tog over the final st of Round 5 and the st you joined into. Join. Each group has 13 sts and a ch-2 tip, and each sc2tog forms a valley between lobes. (65 sts and 5 ch-2 sps)
- Small leaves: fasten off here, leaving a 15 cm (6 in) tail. Skip Round 7.
- Round 7 (medium and large leaves): ch 1, sc in each st around, working 3 sc in each ch-2 sp at the tips. Join, fasten off and weave in the ends. (80)
Stems (all leaves)
- Choose any valley (a sc2tog) as the base of the leaf. Join dark brown yarn there with a sl st.
- Small leaf: ch 6, sl st in the 2nd ch from the hook and in each of the next 4 ch. (5 sl sts)
- Medium leaf: ch 8, sl st in the 2nd ch from the hook and in each of the next 6 ch. (7 sl sts)
- Large leaf: ch 10, sl st in the 2nd ch from the hook and in each of the next 8 ch. (9 sl sts)
- Sl st into the valley st again to anchor the stem, fasten off and weave in the ends.
Embroidered Veins
- Thread a tapestry needle with one strand of yarn in a shade slightly deeper than the leaf, or in dark brown for contrast. Work all veins in backstitch on the right side.
- Main veins (all sizes): bring the needle up at the center ring and backstitch outward along the middle of each lobe, stopping 2 sts short of the tip. Make 5 main veins in total, one per lobe.
- Side veins (medium and large leaves only): halfway along each main vein, embroider one short angled line to the left and one to the right, each about 3 sts long, pointing toward the leaf edge. Make 10 side veins in total.
- Small leaves get the 5 main veins only.
- Keep the stitches loose enough that the fabric does not pucker, then weave in the ends on the wrong side.
Blocking
- Pin each leaf face up on a foam mat, pulling each of the 5 tips out into a clean point and flattening the valleys.
- Mist with water until damp, not soaked, and leave to dry completely, about 24 hours.
- Remove the pins only when the leaf is fully dry, so it holds its shape.
Layout and Assembly
- Lay the leaves on a flat surface in 8 staggered rows with 3, 2, 3, 2, 3, 2, 3 and 2 leaves. Each two-leaf row sits in the gaps of the rows above and below it. This uses all 20 leaves.
- Place the 4 large leaves spread out along the runner, with one near each end and two in the middle, and make sure none touch each other.
- Use the small leaves to fill gaps and the medium leaves for the remaining spaces. Alternate warm shades so no two leaves of the same color sit side by side.
- Let neighboring leaves overlap by about 1 cm (1/2 in) at the tips, and photograph the layout before you start stitching.
- Using matching yarn, join leaves with 3 to 4 small whipstitches at every point where two tips or edges meet. Sew through the back loops only so the stitches stay hidden.
- Work row by row from one end of the runner, and turn the piece over occasionally to check that the right side is clean.
Finishing
Weave in every end on the wrong side, trimming them close once you are sure they will not pull out. Give the whole runner a light steam or mist while it lies flat, and gently nudge any curling tips into place. Cotton gives the crispest points and handles a little spilled water well, but keep hot dishes off the leaves and use a trivet.
Tips for Success
- Keep a stitch count after Rounds 3, 5 and 6. If a round is off, the five lobes will come out uneven.
- Fasten off every leaf with a long tail so you can use it for joining later, and you will not need to cut extra yarn.
- Make the large leaves with the 4.5 mm hook only if your cotton is worsted weight. Using DK with a larger hook makes them too floppy to hold their points.
- Crochet leaves in color batches, for example all rust ones in a sitting, so you do not run out of a dye lot halfway through.
- Block before embroidering and joining, because blocked leaves lie flatter and are much easier to align.
Common Mistakes to Avoid
- Working into the join stitch at the start of Round 6. Skip it, because the final sc2tog uses it, and fix the count back to 65 if you end up with 66.
- Forgetting that Round 4 starts a new group at every fifth stitch. If your leaf looks lopsided, check that Round 3 has exactly 25 sts.
- Skipping blocking. Unblocked leaves curl at the tips and the runner will not lie flat.
- Pulling embroidered veins too tight. This puckers the leaf, so unpick and redo the stitches with a looser tension.
- Joining leaves too tightly. Leave a little give so the runner can be folded or rolled without distorting the points.
Ways to Customize This Pattern
- Change the runner length by adding or removing a pair of rows, one 3-leaf row and one 2-leaf row, or use a 3, 2, 3 layout for a short centerpiece.
- Work all leaves in the same color family, such as burgundies only, for a quieter, more modern look.
- Make a matching set of coasters using small leaves with Round 7 added and a single large leaf as a placemat.
- Add a contrast edge by working Round 7 in a third color, such as gold on a rust leaf.
- Skip the embroidery for a smoother look, or use metallic thread for the veins to catch candlelight.
Frequently asked questions
The finished runner is about 35 x 105 cm (14 x 41 in), though your exact size depends on your tension and how much you overlap the leaves. Measure one blocked leaf of each size first to confirm.
Yes. Use the staggered 3-and-2 row layout and stop after any row, or use only medium leaves for a shorter piece. Each full pair of rows uses 5 leaves.
No. The leaves look good without them, but the veins give them a realistic maple texture, especially on the large and medium sizes. If you are short on time, embroider only the 5 main veins.
Spot clean when you can. If it needs a wash, hand wash gently in cool water, press out the water in a towel and re-block it flat to dry, so the points stay sharp.
The finished The Crochet Maple Leaf Table Runner Pattern for Fall