Gorgeous Crochet Pumpkin Door Swag Pattern (Handmade Fall Door Decor)
Beginner Friendly
Perfect for those just starting their crochet journey, with clear instructions and simple techniques
Single-Day Project
A satisfying project you can complete in a single afternoon or evening.
Handmade Gift
A beautiful keepsake — free forever. Read online or print at home.
About This Gorgeous Crochet Pumpkin Door Swag Pattern (Handmade Fall Door Decor)
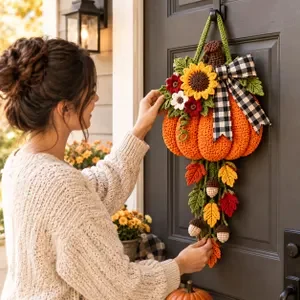
This crochet pumpkin door swag pattern turns a single ribbed pumpkin into a full fall door display. The pumpkin is worked sideways in back-loop rows, gathered and cinched into six deep lobes, then dressed with a layered sunflower, two rolled roses, a small cream flower, broad green leaves and a black-and-white checked bow worked in tapestry crochet. A twisted green cord hangs it from your door hook, and a strand of maple leaves and little acorns drops from the bottom for movement.
It is a big project made from many small parts, so plan on 14 to 18 hours in total. The pumpkin itself goes quickly in bulky yarn; the time goes into the flowers, the bow’s color changes, the eleven garland pieces and careful assembly. Most of the small pieces are good to crochet in short sessions while the pumpkin waits.
This pattern suits crocheters who are comfortable with working in the round, front post stitches and carrying a second color. If you have made a few amigurumi and want a decorative piece that holds up on a door all season, this is a good next step. It also makes a generous housewarming or hostess gift.
Materials
- Bulky (#5) acrylic yarn, pumpkin orange about 150 m / 165 yd
- Worsted (#4) acrylic yarn, leaf green about 70 m, for leaves, hanging cord and garland
- Worsted yarn, dark green scraps, for leaf veins
- Worsted yarn, dark brown about 25 m, for stem, sunflower center and acorn caps
- Worsted yarn, golden yellow about 35 m, for sunflower petals and maple leaves
- Worsted yarn, burgundy red about 40 m, for roses, flower center and maple leaves
- Worsted yarn, burnt orange about 15 m, for maple leaves
- Worsted yarn, black about 30 m, for bow and sunflower seed knots
- Worsted yarn, white or cream about 30 m, for bow and small flower
- Worsted yarn, tan about 10 m, for acorns
- 6.0 mm crochet hook pumpkin
- 4.0 mm crochet hook all other pieces
- Polyester fiberfill about 150 g
- Plastic canvas sheet or stiff craft felt one 14 cm circle, for a flat back
- Long doll needle at least 15 cm, for cinching the lobes
- Tapestry needle, stitch markers, scissors
- Over-the-door wreath hanger
- Fabric stiffener optional, for crisper leaves and bow
Abbreviations
MRmagic ringchchainsl stslip stitchscsingle crochethdchalf double crochetdcdouble crochettrtreble crochetinc2 sc in the same stitchsc2togsingle crochet 2 together (decrease)BLOback loop onlyFLOfront loop onlyFPdcfront post double crochet around the stitch below( ) ×nrepeat the stitches in brackets n times(24)stitch count at the end of the round or rowPumpkin
- With bulky orange and 6.0 mm hook, ch 29.
- Row 1: sc in 2nd ch from hook and in each ch across. (28)
- Rows 2–90: ch 1, turn, sc in BLO of each st across. (28) The ribs run along the rows and become the pumpkin’s vertical texture.
- Seam: do not fasten off. Fold the piece so Row 90 lies against the foundation chain. Sl st through the back loop of each Row 90 st and the matching unused loop of the foundation chain. (28 sl st) You now have a ribbed tube. Fasten off with a 40 cm tail.
- Bottom: thread a tapestry needle with a new 40 cm length of orange. Weave it through the end of every row along one open edge (90 row ends) and pull tightly to close. Knot securely and push the knot inside.
- Cut a 14 cm circle of plastic canvas. Slide it upright inside the tube against one side; this side becomes the back and will sit flat on the door.
- Stuff the front half firmly and the edges around the canvas moderately, aiming for a depth of 7–8 cm front to back.
- Top: weave the seam tail through the row ends of the remaining opening and pull closed. Do not cut the tail yet.
- Lobes: thread the doll needle with a doubled 1.5 m length of orange. Pass it from top center straight down through bottom center. Bring the yarn up the outside along the seam line, re-enter at top center and pull until the yarn sinks about 1.5 cm into the surface. Repeat every 15 rows around for 6 lobes in total. Knot at the top center.
Pumpkin Stem
- With dark brown worsted and 4.0 mm hook, 6 sc in MR. (6)
- Rnd 2: inc in each st around. (12)
- Rnd 3: sc in BLO of each st around. (12) This gives the stem a crisp cut top.
- Rnds 4–9: (FPdc around next st of the previous round, sc in next st) ×6. (12) The front post stitches stack into woody ridges.
- Rnd 10: (sc, inc) ×6. (18)
- Rnd 11: (2 sc, inc) ×6. (24)
- Stuff firmly. Fasten off with a 40 cm tail for sewing.
Twisted Hanging Cord
- Cord (make 2): with leaf green and 4.0 mm hook, ch 100.
- Sl st in the back bump of 2nd ch from hook and in each ch across. (99) Fasten off, leaving 20 cm tails at both ends.
- Lay both cords side by side, knot them together at one end and twist them around each other about 15 times. Knot the other end so the twist holds.
Sunflower
- Center: with dark brown, 6 sc in MR. (6)
- Rnd 2: inc in each st around. (12)
- Rnd 3: (sc, inc) ×6. (18)
- Rnd 4: (2 sc, inc) ×6. (24) Sl st to join and fasten off.
- Back petal layer: join golden yellow in the BLO of any st of Rnd 4. *Ch 7, sc in 2nd ch from hook, hdc in next ch, dc in next 2 ch, hdc in next ch, sc in last ch, sl st in BLO of the same Rnd 4 st, sl st in BLO of the next 2 sts.* Repeat from * 11 more times, working the last repeat’s travel stitch into the starting st. (12 petals) Fasten off.
- Front petal layer: join golden yellow in the FLO of a Rnd 4 st that sits between two back petals. Work the same petal repeat in FLO, placing each petal between two back petals. (12 petals) Fasten off.
- Seeds: with black, embroider about 12 French knots scattered over the brown center.
Rolled Roses (make 2)
- With burgundy red, ch 35.
- Row 1: sc in 2nd ch from hook and in each ch across. (34)
- Row 2: ch 1, turn, (3 dc in next st, sl st in next st) ×6, (5 dc in next st, sl st in next st) ×11. (17 petals) Fasten off with a 40 cm tail.
- Starting from the small-petal end, roll the strip loosely, keeping the bottom edge level. Use the tail to stitch through all layers at the base several times so the rose holds its shape.
Small Cream Flower
- With burgundy red, 10 sc in MR, sl st to first sc to join. (10) Fasten off.
- Join cream in any st. *(Hdc, dc, dc, hdc) in next st, sl st in next st.* Repeat from * 4 more times. (5 petals)
- Fasten off, leaving a tail for sewing.
Large Pumpkin Leaves (make 3)
- With leaf green, ch 13.
- Sc in 2nd ch from hook, hdc in next ch, dc in next 2 ch, tr in next 3 ch, dc in next 2 ch, hdc in next ch, sc in next ch. (11)
- 3 sc in last ch to round the base. (3)
- Rotate and work along the opposite side of the chain: sc in next ch, hdc in next ch, dc in next 2 ch, tr in next 3 ch, dc in next 2 ch, hdc in next ch, sc in next ch. (11)
- Tip: ch 2, sl st in the first sc. (25 sts plus tip) Fasten off with a tail.
- With dark green, surface slip stitch a center vein from base to tip and two short side veins on each side.
Buffalo Check Bow
- Color work: change colors on the last yarn over of the stitch before the new color, and carry the unused color along the top of the row, working over it so it is hidden inside the stitches. Ch 1 at the start of each row does not count as a stitch.
- Bow loops: with black, ch 19. Row 1: sc in 2nd ch from hook and in each ch across, working (3 sc black, 3 sc white) ×3. (18)
- Rows 2–3: ch 1, turn, sc across, matching colors to the blocks below. (18)
- Rows 4–6: ch 1, turn, sc across, placing white over black blocks and black over white blocks. (18)
- Rows 7–48: repeat Rows 1–6 seven more times, so the blocks alternate every 3 rows. (18) Fasten off both colors and weave in ends.
- Tails (make 2): with black, ch 10. Row 1: sc in 2nd ch from hook and across as (3 black, 3 white, 3 black). (9) Rows 2–3: continue the same blocks. (9) Rows 4–6: (3 white, 3 black, 3 white). (9) Rows 7–18: repeat Rows 1–6 twice. (9)
- Tail point, keeping the block colors as established: Row 19: ch 1, turn, sc2tog, sc to end. (8) Row 20: ch 1, turn, sc to last 2 sts, sc2tog. (7) Row 21: as Row 19. (6) Row 22: as Row 20. (5) Row 23: as Row 19. (4) Row 24: as Row 20. (3) Fasten off. Both decreases fall on the same edge, giving an angled end.
- Center band: with black, ch 7. Row 1: sc in 2nd ch from hook and across. (6) Rows 2–12: ch 1, turn, sc across. (6) Fasten off with a 30 cm tail.
- Shape: fold both short ends of the bow loop piece to the middle, overlapping 1 cm, and sew. Pinch the center, lay the two tails behind it in an upside-down V, wrap the band around all layers and sew the band closed at the back.
Maple Leaves (make 6: 2 burgundy, 2 golden yellow, 2 burnt orange)
- 10 sc in MR, sl st to first sc to join. (10)
- Rnd 2: *(hdc, dc, ch 3, sl st in 3rd ch from hook, dc, hdc) in next st, sl st in next st.* Repeat from * 4 more times. (5 pointed lobes)
- Stem: ch 7, sl st in 2nd ch from hook and in each remaining ch, sl st into the leaf base. Fasten off with a tail.
Small Garland Leaves (make 2)
- With leaf green, ch 9.
- Sc in 2nd ch from hook, hdc in next ch, dc in next 3 ch, hdc in next ch, sc in next ch. (7)
- 3 sc in last ch. (3)
- Along the opposite side: sc, hdc, dc in next 3 ch, hdc, sc. (7)
- Tip: ch 2, sl st in first sc. (17 sts plus tip) Surface slip stitch a dark green center vein. Fasten off with a tail.
Acorns (make 3)
- Nut: with tan, 6 sc in MR. (6)
- Rnd 2: (sc, inc) ×3. (9)
- Rnd 3: (2 sc, inc) ×3. (12)
- Rnd 4: (3 sc, inc) ×3. (15)
- Rnd 5: (4 sc, inc) ×3. (18)
- Rnds 6–7: sc in each st around. (18) Stuff firmly and fasten off, leaving the top open.
- Cap: with dark brown, 6 sc in MR. (6)
- Rnd 2: inc in each st around. (12)
- Rnd 3: (sc, inc) ×6. (18)
- Rnd 4: (sc in next st, FPdc around next st of Rnd 3) ×9. (18) This gives the cap its scaly texture.
- Rnd 5: (5 sc, inc) ×3. (21) The cap now flares slightly wider than the nut. Fasten off with a 30 cm tail.
- Stem: join dark brown at the MR, ch 4, sl st in 2nd ch from hook and next 2 ch, sl st into the MR. Fasten off.
- Push the open top of the nut into the cap and whipstitch the cap’s Rnd 4 to the nut’s Rnd 7.
Leaf Garland
- With leaf green, ch 56.
- Sl st in the back bump of 2nd ch from hook and in each ch across. (55) Fasten off with 20 cm tails at both ends.
- Starting 2 cm below the top and spacing pieces about 4 cm apart, sew on, alternating left and right: burgundy maple, golden maple, small green leaf, acorn, burgundy maple, golden maple, acorn, burnt orange maple, small green leaf, acorn. Sew the last burnt orange maple to the very bottom end.
- Attach each piece by its stem or cap stem only, so it dangles and moves rather than lying flat against the chain.
Finishing
Pin the stem over the top gather of the pumpkin, slightly tilted, and sew all the way around its base with the brown tail. Sew one end of the twisted cord on each side of the stem, stitching down through the pumpkin and catching the edge of the plastic canvas so the weight hangs from the backing rather than the yarn surface. The loop should measure about 40 cm when held up.
Lay the pumpkin face up and plan the cluster before sewing anything. Tuck two large leaves behind the upper left edge of the pumpkin and sew them in place, then sew the sunflower over them so it overlaps the top left lobe. Place one rose to the left of the sunflower and the second rose just below it, with the cream flower tucked between them. Sew the third large leaf under the right side of the stem, then sew the bow over it, close to the stem, with the tails falling down the right side of the pumpkin. Tack each tail at its midpoint so it stays put.
Sew the top of the leaf garland to the bottom gather of the pumpkin, under the center. Weave in all remaining ends. If you want crisper leaves and bow loops, brush them lightly with fabric stiffener and let them dry flat before hanging. Hang from an over-the-door wreath hanger.
Tips for Success
- Count your pumpkin rows with a marker every 15 rows. Those markers become your cinching guides, so the six lobes come out the same width.
- Cinch the lobes with doubled yarn and tighten them gradually, going around twice, rather than pulling one lobe tight at a time. This keeps the pumpkin from leaning to one side.
- On the bow, keep the carried strand slightly loose. A tight float makes the checked fabric curl and the bow loops collapse.
- Arrange every flower and leaf with pins and hang the pumpkin up for a minute before sewing. The cluster often looks different vertically than it does on a table.
- Leave long tails on every small piece. Sewing with the piece’s own tail is much tidier than starting fresh yarn on the pumpkin surface.
Common Mistakes to Avoid
- Working the pumpkin rows in both loops. Without BLO the ribs disappear and the pumpkin looks flat and plain. If you notice early, rip back; the texture cannot be added later.
- Overstuffing the back. A round back makes the swag rock and tilt on the door. Keep the plastic canvas against the back wall and put most of the stuffing in front of it.
- Sewing the hanging cord only through the outer stitches. The weight pulls the stitches open over time. Always sew through to the backing.
- Letting the sunflower petals cup forward. If the back layer was worked too tightly, steam the petals lightly and press them flat with your fingers.
- Gluing the garland pieces flat. They should swing on their stems; if they are attached along their whole length, the garland looks stiff.
Ways to Customize This Pattern
- Make a heirloom white pumpkin in cream bulky yarn with a sage green stem, dusty pink roses and a sage-and-cream checked bow.
- Switch the bow to red and black for a classic lumberjack buffalo check that works from Halloween through Thanksgiving.
- Make a smaller swag in worsted yarn with a 4.0 mm hook: work 26 sc per row and 72 rows, cinching every 12 rows for 6 lobes.
- Replace the sunflower with a crochet mum or dahlia for a later autumn look.
- Crochet a small banner in black with a white surface-stitched family name or “Welcome” and hang it across the garland.
Frequently asked questions
Yes, if the door is covered by a porch or awning. Acrylic yarn handles sun better than cotton and will not rot, but direct rain soaks the stuffing and the pumpkin can lose its shape. Avoid storm doors that trap heat against the piece.
You can. A 4 cm wide wired buffalo check ribbon tied into a bow gives a very similar look and saves a couple of hours. Sew it on through the knot rather than gluing it so it can be removed and fluffed.
It gives the pumpkin a flat back so it sits against the door instead of rolling, and it gives the hanging cord something solid to anchor to. Stiff craft felt or a piece of cardboard covered in plastic wrap also works.
Yes. Use the smaller pumpkin counts in the customization section and keep all other pieces as written. The pumpkin will be closer to 16 cm wide, so you may want to leave out one rose so the cluster does not overwhelm it.
The finished Gorgeous Crochet Pumpkin Door Swag Pattern (Handmade Fall Door Decor)