Elegant Beige Crochet Bedspread Pattern with Flowers
Beginner Friendly
Perfect for those just starting their crochet journey, with clear instructions and simple techniques
Single-Day Project
A satisfying project you can complete in a single afternoon or evening.
Handmade Gift
A beautiful keepsake — free forever. Read online or print at home.
About This Elegant Beige Crochet Bedspread Pattern with Flowers
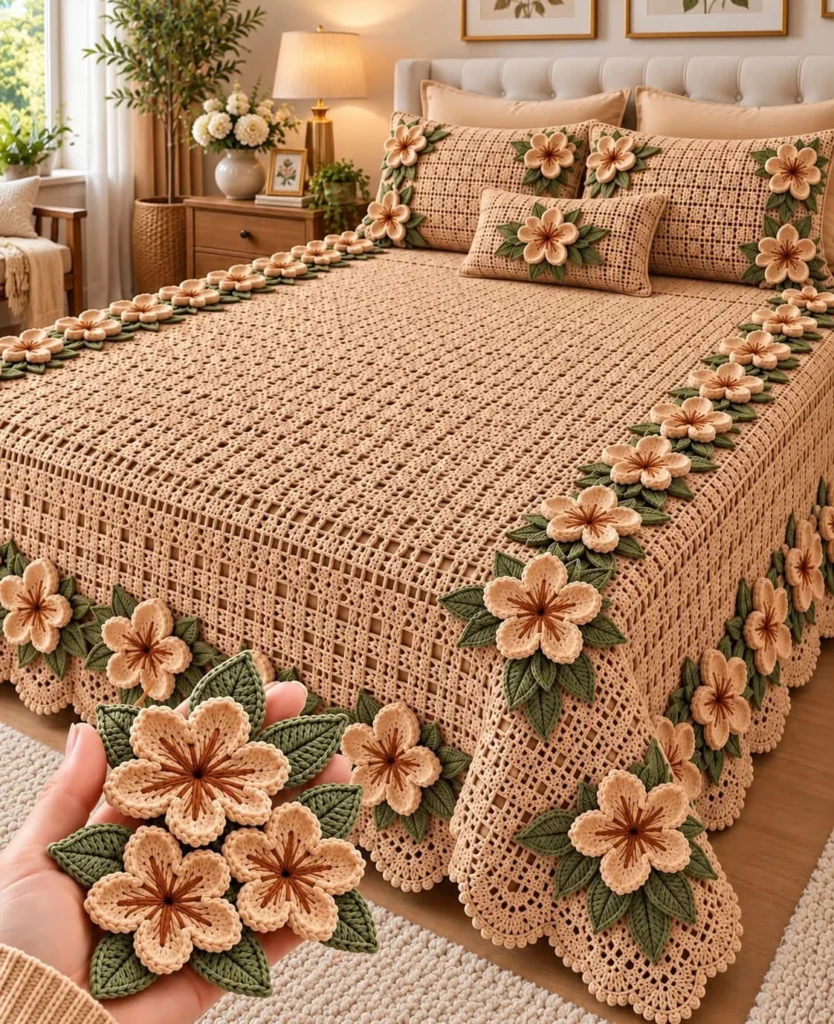
This elegant beige crochet bedspread pattern gives you a full bed set built from one simple stitch and a lot of patience. The body is a warm camel filet mesh with a solid row every sixth row, which creates the soft grid you see in the photo. A scalloped, picot-trimmed edge runs down both sides and across the foot, and rows of dimensional peach flowers with olive leaves follow the edge like a garland.
The flowers are the part that makes it special. Each one has five rounded petals worked in a single round, and the rust-colored spokes in the center are embroidered on afterward, so every bloom looks hand-finished. You also make a pair of matching pillow shams and a small lumbar cushion, each with its own mesh panels, envelope back and flowers.
This is an advanced, long-term project. Expect roughly 120 to 160 hours in total, with the mesh body taking most of that time. It suits crocheters who are comfortable with turning chains, counting stitches across long rows, and sewing many small pieces onto a larger fabric. The mesh itself is easy and relaxing, and the flowers are ideal to make in batches while you watch something.
Materials
- DK mercerized cotton, camel / warm beige (body, edging, shams) approx. 3,000 g
- DK mercerized cotton, light peach (flowers) approx. 350 g
- DK mercerized cotton, olive green (leaves) approx. 650 g
- DK cotton, rust / burnt orange (embroidered flower centers) approx. 50 g
- 3.5 mm crochet hook body, edging, shams
- 3.0 mm crochet hook flowers and leaves
- Tapestry needle for embroidery and sewing on appliqués
- Stitch markers to mark every 50th space on long rows
- Blocking mats and rustproof pins or a clean bed to block on
- Pillow forms two of 50 x 75 cm, one of 30 x 50 cm
Abbreviations
chchainsl stslip stitchscsingle crochethdchalf double crochetdcdouble crochetst(s)stitch(es)spspace (the gap made by a ch 1)MRmagic ringRS / WSright side / wrong sidereprepeatpicotch 3, sl st in the first of those 3 chMain Bedspread Panel (camel, 3.5 mm hook)
- Row 1 (foundation): Ch 438. Dc in the 6th ch from hook (the skipped chs count as dc + ch 1), *ch 1, skip 1 ch, dc in next ch; rep from * to end. Turn. (217 spaces)
- Rows 2-5 (mesh rows): Ch 4 (counts as dc + ch 1), skip first dc and first ch-1 sp, dc in next dc, *ch 1, skip next ch-1 sp, dc in next dc; rep from * across. Turn. (217 spaces)
- Row 6 (solid row): Ch 3 (counts as dc), skip first st, dc in each ch-1 sp and each dc across. Turn. (435 dc)
- Row 7 (first mesh row after a solid row): Ch 4 (counts as dc + ch 1), skip first 2 sts, dc in next st, *ch 1, skip next st, dc in next st; rep from * across. Turn. (217 spaces)
- Rows 8-11: Work as Rows 2-5. (217 spaces)
- Row 12: Work as Row 6. (435 dc)
- Rep Rows 7-12 (5 mesh rows, then 1 solid row) until you have completed Row 270, which is a solid row. Place a marker at every 50th space on a few rows to check your count. Do not skip the counting; one lost space ruins the straight edge.
- Rows 271-272: Work Row 7 once, then one regular mesh row as in Rows 2-5. (217 spaces) The panel now has 272 rows and measures about 200 x 250 cm before blocking. Do not fasten off; continue straight into the edging.
Scalloped Picot Edging (camel, 3.5 mm hook)
- Row 1: Turn so the right side faces you. Ch 1 and work sc down the first long side, placing 3 sc in every 2 row-ends (about 408 sc). Place 3 sc in the corner.
- Work 1 sc in each dc and each ch-1 sp across the foot (435 sc). Place 3 sc in the next corner.
- Work up the second long side to match the first (about 408 sc). Do not edge the top, since that end tucks under the pillows. Your total should land close to 1,255 sc.
- Check your count. You need 1 + a multiple of 6 (1,255 gives 209 scallops). If you are off, add or skip a few sc evenly along the sides, never in the corners.
- Row 2 (scallops): Turn. Ch 1, sc in first sc. *Skip 2 sc, work 5 dc in next sc and work a picot after the 1st, 3rd and 5th dc, skip 2 sc, sc in next sc; rep from * to end. Fasten off. (209 scallops)
Flower (make 68, peach, 3.0 mm hook)
- Round 1: MR, ch 1, 5 sc in ring. Join with a sl st to first sc. (5)
- Round 2: Ch 1, 2 sc in each st around. Join. (10)
- Round 3: Ch 1, *sc in next st, 2 sc in next st; rep from * 4 more times. Join. (15)
- Round 4 (petals): *In next st work (sc, hdc, 3 dc, hdc, sc), sl st in each of the next 2 sts; rep from * 4 more times. This gives 5 petals and uses all 15 sts. Join with a sl st to the base of petal 1. Fasten off and weave in the ends.
- Center: Thread the rust yarn on a needle. Embroider 10 straight-stitch spokes from the center outward, 2 per petal, each about 2 cm long. Pull each stitch snug so it sits slightly into the fabric.
Leaf (make 408, olive green, 3.0 mm hook)
- Ch 9.
- Sl st in 2nd ch from hook, sc in next ch, hdc in next ch, dc in next ch, hdc in next ch, sc in next ch, sl st in next ch. (7 sts)
- Work 3 sc in the last ch to form the tip. (3 sc)
- Turn and work along the underside of the foundation ch: sl st, sc, hdc, dc, hdc, sc, sl st in the next 7 chs. (7 sts)
- Sl st in the first ch. Fasten off, leaving a 20 cm tail for sewing. (17 sts total)
Pillow Sham (make 2, camel, 3.5 mm hook)
- Front: Ch 114. Work Row 1 as for the main panel. (55 spaces)
- Work the same 6-row repeat: mesh rows, then a solid row (111 dc) on every 6th row, using the Row 7 start after each solid row. Continue until you have 83 rows. Rows 79-83 are mesh rows after the Row 78 solid row. Fasten off.
- Back flaps (make 2): Ch 114. Work Row 1 and the same repeat for 48 rows, ending on the solid Row 48. Fasten off.
- Assembly: Lay the front right side up, then place the two flaps on top, right sides down, overlapping them by about 12 cm in the middle. Join all edges through all layers with sc, working 3 sc in each corner. Turn right side out.
Lumbar Cushion (make 1, camel, 3.5 mm hook)
- Front: Ch 70. Work Row 1 as for the main panel. (33 spaces)
- Work the same 6-row repeat (solid rows have 67 dc) until you have 55 rows. Rows 55 is a mesh row after the Row 54 solid row. Fasten off.
- Back flaps (make 2): Ch 70. Work Row 1 and the same repeat for 36 rows, ending on the solid Row 36. Fasten off.
- Assemble as for the pillow sham, overlapping the flaps by about 16 cm.
Finishing
Weave in every end, then block the bedspread flat, pinning the scallops open so each picot sits neatly. Block the shams on a towel and let everything dry completely. Pin each flower and its leaves in place before sewing: sew 3 leaves behind the top half of the flower and 3 behind the bottom half, so the tips fan out, then sew the flower on top. Use a matching yarn and stitch only through the posts of the mesh so the grid does not pucker.
Place the side garlands about 25 cm in from each side edge, where the cover turns over the mattress, with 25 flowers per side at about 10 cm apart. Space 13 flowers along the foot at about 15 cm apart. Sew 2 flowers on each sham and 1 flower on the lumbar cushion. Check the layout from across the room before you sew anything down permanently.
Tips for Success
- Buy all the camel yarn at once from the same dye lot. A shift in tone across 250 cm of mesh is very visible.
- Count your spaces after every solid row. It is the easiest checkpoint because the stitch count is known (435 dc).
- Embroider the flower centers before you sew the flowers on. It is much easier to hold a loose flower than a bedspread.
- Make flowers and leaves in batches of ten, so you can see right away if your tension drifts.
- Keep the 3.0 mm hook for the appliqués. A tighter fabric keeps the petals crisp and the leaves from flopping.
Common Mistakes to Avoid
- Losing a space at the start of a row. Always skip the first dc and the first ch-1 sp after the ch 4, then work the next dc into the second dc. Count back if the edge starts to angle in.
- Wavy side edges. If the sc edging ruffles, you worked too many sc per row-end. Rip back and use 3 sc per 2 row-ends.
- Curling flowers. Pin them flat and steam or lightly starch them before sewing, and block them face down on a towel.
- Sewing appliqués too tight. Pulling the yarn firmly makes the mesh pucker around each flower; sew with relaxed stitches.
- Skipping the gauge swatch. This pattern uses large stitch counts, so a different gauge changes the final size by many centimeters.
Ways to Customize This Pattern
- Resize the panel: each 11 spaces add about 10 cm of width and each 11 rows add about 10 cm of length. Keep the width at an odd number of spaces counted from your swatch, and keep the solid row on every 6th row.
- Change the palette: ivory body with sage leaves, or a dusty rose flower with a cream body.
- Add a second flower garland around the pillow shams, or sew a full row of flowers across the headboard end.
- Make a smaller throw version: 110 spaces by 150 rows with a single garland on one long edge.
- Swap the edging for a plain row of sc if you want a simple, modern line instead of the scalloped trim.
Frequently asked questions
Plan on about 3,000 g of camel DK cotton for the body, edging and pillows, about 350 g of peach, 650 g of green and 50 g of rust. These amounts depend on your gauge, so work your swatch first and buy a little extra from the same dye lot.
Yes, but you must recalculate the number of spaces and rows from your own gauge. A thicker yarn makes the mesh larger and the flowers bigger, and uses far more yarn. Keep an odd count of dc so the mesh starts and ends on a dc.
Hand wash in cool water, press out the water in a towel without twisting, and dry flat. Mercerized cotton can take a gentle machine cycle, but the appliquéd flowers hold their shape best when you avoid agitation and heat.
Yes. The flowers and leaves are separate pieces, so you can finish and block the bedspread first and add the garlands over time. This is also a good way to spread out the work.
The finished Elegant Beige Crochet Bedspread Pattern with Flowers