Golden Star Mistletoe Amigurumi Ornament Pattern
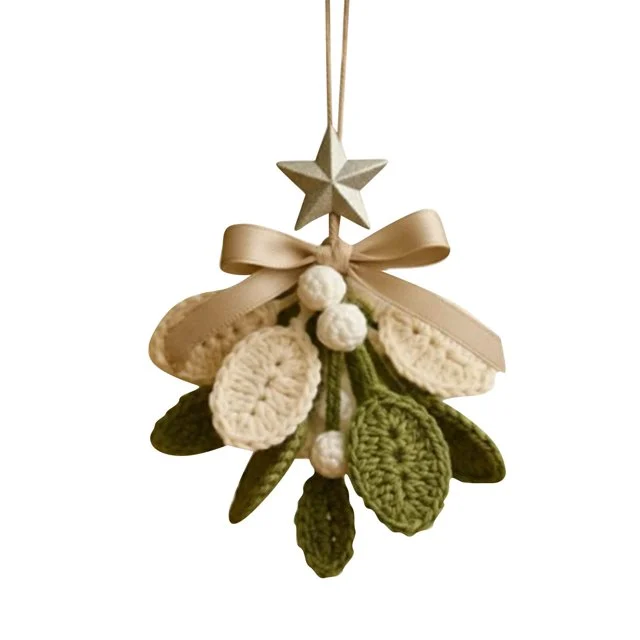
Beginner Friendly
Perfect for those just starting their crochet journey, with clear instructions and simple techniques
Single-Day Project
A satisfying project you can complete in a single afternoon or evening.
Handmade Gift
A beautiful keepsake — free forever. Read online or print at home.
About This Golden Star Mistletoe Amigurumi Ornament Pattern
This mistletoe amigurumi ornament brings the classic holiday sprig to life in yarn, layering two different leaf shapes, a trio of soft berries, a shimmering little star, and a wrapped bow into one hanging piece. It’s built from fourteen small components rather than one big shape, so it reads as advanced work — every piece is quick on its own, but the payoff is in how carefully they’re arranged and stitched together at the end.
Expect to spend three to four hours on this one, most of it split between the eight leaves and three berries, with the star and bow going faster once your tension settles in. It suits a crocheter who’s comfortable working flat motifs from a foundation chain, not just spheres in the round — if you’ve made amigurumi animals before but never a flat leaf or a picot star, this is a good next pattern to try.
Because everything is small and gathered into one cluster, it’s an efficient stash-buster: each piece uses only a small amount of yarn, so it’s a nice project for using up leftover cream, sage, and metallic scraps before the holidays.
Materials
- Cream/ivory DK weight yarn ~10 g, for the oval leaves and berries
- Sage or olive green DK weight yarn ~10 g, for the pointed leaves
- Champagne or tan DK weight yarn ~5 g, for the bow
- Silver or gold metallic yarn (DK or sport weight) small amount, for the star
- 3.5 mm (US E/4) crochet hook
- Small amount of polyester stuffing for the berries only
- Tapestry needle
- Stitch marker
- 20 cm length of cord, ribbon, or embroidery floss for the hanging loop
- Fabric stiffener or diluted PVA glue optional, to help the leaves and star hold their shape
Abbreviations
MRmagic ringchchainscsingle crochetsl stslip stitchincincrease (2 sc in same st)dec / sc2togdecrease (single crochet 2 sts together)st(s)stitch(es)rndroundreprepeatRSright sideCream Oval Leaves (make 4)
- With cream yarn, ch 9.
- Rnd 1: Starting in 2nd ch from hook, sc in each of next 7 ch (7 sc), 3 sc in last ch — this is the rounded tip — then rotate to work into the remaining loops along the other side of the foundation chain: sc in each of next 7 ch (7 sc), 2 sc in same loop as your first st, join with sl st to first sc. (19 sc)
- Rnd 2: Ch 1 (does not count as a st), sc in same st as join and in each st around, keeping the piece flat — no increases or decreases this round, join with sl st. (19 sc)
- Fasten off, leaving a 20 cm tail for sewing into the cluster.
- Repeat for a total of 4 oval leaves.
Sage Pointed Leaves (make 4)
- With sage green yarn, ch 10.
- Rnd 1: Sc in 2nd ch from hook and in each of next 6 ch (7 sc), 3 sc in last ch — this is the leaf tip — then rotate and work into the remaining loops along the other side: sc in each of next 6 ch (6 sc), sc2tog over the last 2 loops to form the base point (1 sc), join with sl st to first sc. (17 sc)
- Rnd 2: Ch 1, sc in each st around, working 3 sc in the center tip stitch to keep the point sharp, and sc2tog at the base point stitch to keep that end sharp too, join with sl st. (19 sc)
- Fasten off, leaving a 20 cm tail.
- Repeat for a total of 4 pointed leaves.
White Berries (make 3)
- With cream yarn, rnd 1: 6 sc in MR. (6 sc)
- Rnd 2: Inc in each st around. (12 sc)
- Rnd 3: Sc in each st around. (12 sc)
- Add a small pinch of stuffing — just enough to round the berry out, not pack it firm.
- Rnd 4: (Sc2tog) x6. (6 sc)
- Rnd 5: (Sc2tog) x3. (3 sc)
- Fasten off, cinch the opening closed, and leave a 15 cm tail for attaching.
- Repeat for a total of 3 berries.
Metallic Star (make 1)
- With metallic yarn, rnd 1: 5 sc in MR. (5 sc)
- Rnd 2 (points): *Ch 5, sc in 2nd ch from hook and in each of next 3 ch, sl st into the same stitch of the ring the point started from; sl st into the next st of the ring; rep from * 4 more times, until 5 points have been made and you’re back at the start.
- Fasten off, leaving a 15 cm tail. Work the points with relaxed tension so they lie flat instead of curling.
Ribbon Bow
- Bow body — with champagne yarn, row 1: Ch 21, sc in 2nd ch from hook and in each ch across. (20 sc) Ch 1, turn.
- Rows 2-4: Sc in each st across. (20 sc each row) Ch 1, turn after rows 2 and 3.
- Fasten off after row 4, leaving a long 30 cm tail.
- Pinch the rectangle in half widthwise so the two short ends meet, gathering the center tightly. Wrap the tail several times around the pinched center to cinch it into a bowtie shape, then secure with a few stitches and don’t cut the tail yet.
- Center wrap — with champagne yarn, ch 8, sc in 2nd ch from hook and in each ch across. (7 sc) Fasten off, leaving a 15 cm tail.
- Wrap this narrow strip around the cinched center of the bow, covering the gathering stitches, and sew the short ends together at the back.
Hanging Loop
- With cream or champagne yarn, ch 16.
- Sl st into the first chain to form a loop.
- Fasten off, leaving a 10 cm tail for attaching. (A folded and knotted 20 cm length of ribbon or cord also works in place of this chain.)
Finishing
Lay all the pieces out flat before sewing anything permanently: the 4 sage pointed leaves as the back layer, the 4 cream oval leaves layered in front of them and fanned out in a rough circle, the 3 berries clustered at the center where the leaf tails meet, the finished bow sitting just above the berries, and the star above the bow. Once the arrangement looks balanced, sew each piece through its tail into the layers beneath it, working from the back leaves forward so nothing shifts. Attach the hanging loop directly behind the star at the very top, stitching through several layers so it can bear the ornament’s weight. Weave in all remaining ends on the back of the cluster. If you’re using fabric stiffener, apply a light coat to both faces of the leaves and star only, then lay the whole piece flat (or over a gently curved form) to dry so the leaves keep a slight natural curve.
Tips for Success
- Work all the flat motifs — leaves and star — at a tight, even gauge; a loose motif won’t hold its oval or point shape once it’s part of the hanging cluster.
- Leave extra-long tails (20-30 cm) on every small piece so you can sew it straight into the cluster without rejoining new yarn later.
- Pin or lay out the full arrangement on a flat surface before sewing anything permanently, so the leaves end up fanned evenly around the berries.
- Use a hook a size smaller than the yarn label suggests for the berries, so the stuffing doesn’t peek through the stitches.
- Keep tension relaxed on the metallic star’s points — metallic yarn splits easily, and stitching it too tightly makes the points curl instead of lying flat.
Common Mistakes to Avoid
- Mixing up the two leaf shapes when layering: sew the sage pointed leaves as the back layer and the cream ovals in front, as in a real mistletoe sprig, or the layered look flattens out.
- Overstuffing the berries: they should stay small and slightly soft so they nestle naturally among the leaves. Use just a pinch of stuffing, not a packed handful.
- Sewing the bow into the cluster before shaping it: cinching a bow that’s already attached is fiddly. Gather and wrap it into shape first, then sew the finished bow on.
- Skipping the stiffening step: without it, the leaves tend to curl inward over time. A light coat of fabric stiffener or diluted glue, dried flat, keeps them crisp.
- Losing track of which face is the right side on the flat pieces, since both sides look similar mid-round. Mark round 1’s first stitch and keep that face outward throughout.
Ways to Customize This Pattern
- Swap the cream and sage yarn for deep red and holly green for a classic holly-and-berries version instead of mistletoe.
- Use a fine gold or silver chain instead of the crocheted loop for a more polished, boutique-style hanger.
- Make the whole ornament about half-size with fingering weight yarn and a 2.5 mm hook for a set of mini gift tags.
- Replace the crocheted star with a small jingle bell or a cluster of wooden beads for a different focal point.
- Add a second, smaller berry cluster and one extra pair of leaves for a fuller, more layered sprig.
Frequently asked questions
Yes — size up to a 4 mm hook. The finished ornament will come out roughly 20% larger, which still looks proportional and works fine on a tree or wreath.
They don’t need it, but laying a short length of florist wire along the tail before closing gives you more control if you want the leaves to fan out at a specific angle.
Avoid washing it. Since it’s a small holiday accent piece, spot-clean gently with a damp cloth if needed and keep it away from direct heat, which can dull metallic yarn.
You can, but avoid stiffening the berries and bow — stiffener flattens their rounded, soft shape, which is part of what makes them read as berries and a bow rather than flat discs.
The finished Golden Star Mistletoe Amigurumi Ornament Pattern