Elegant White Floral Crochet Bedspread Pattern

Beginner Friendly
Perfect for those just starting their crochet journey, with clear instructions and simple techniques
Single-Day Project
A satisfying project you can complete in a single afternoon or evening.
Handmade Gift
A beautiful keepsake — free forever. Read online or print at home.
About This Elegant White Floral Crochet Bedspread Pattern
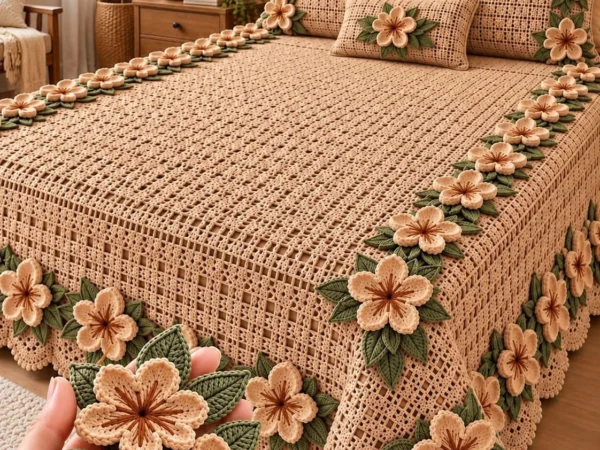
This crochet flower bedspread pattern is built from lace squares, and each square has a raised, layered ivory bloom resting on a filet mesh panel. Four sage green leaves sit under each flower and point toward the corners. A checkerboard frame of open blocks and a ring of picot-edged fans surround the center. When the squares are joined, those fans meet in rounded arches, which give the whole spread the soft, old-fashioned look of a lace heirloom.
The square is not a simple granny. Each one has seven separate parts: the filet center, the checkerboard frame, the fan-and-picot edge, a four-layer flower with petals worked behind each other, a rolled bud for the center, four shaped leaves in a second color, and embroidered surface details. The squares are joined as you go on the last round, so there is no seaming at the end. One square takes about 1.5 to 2 hours once you know the pattern. The full queen-size spread uses 99 squares and a scalloped border, which comes to about 180 to 220 hours in total.
This pattern is for confident crocheters who are comfortable reading stitch counts, working back-post stitches and keeping lace even over a large project. If you aren’t ready for a full bedspread, the same square makes a pillow sham, a table runner or a throw. Every count below has been checked round by round, so you can trust the numbers and count as you go.
Materials
- DK / light worsted mercerized cotton, ivory approx. 4,300 g for queen size (about 86 x 50 g balls); roughly 40 g per square plus border
- DK / light worsted mercerized cotton, sage green approx. 300 g (about 6 x 50 g balls); roughly 3 g per square for leaves
- 3.5 mm crochet hook for the square and border
- 3.0 mm crochet hook optional, for firmer flower petals and leaves
- Tapestry needle for sewing flowers and leaves and weaving in ends
- Locking stitch markers to mark corners and the start of rounds
- Blocking mats and rust-proof pins enough to block at least 4 squares at a time
- Spray bottle and light spray starch optional, for crisp lace
- Scissors and a tape measure gauge: Rounds 1-7 of the center = 16 cm square after blocking
Abbreviations
MRmagic ringchchainsl stslip stitchscsingle crochethdchalf double crochetdcdouble crochettrtreble crochetBPscback post single crochet (sc worked around the post from behind)skskipspspacest(s)stitch(es)begbeginningreprepeatpicotch 3, sl st in 3rd ch from hookJAYGjoin as you go3D Layered Flower (ivory, make 1 per square)
- Round 1: MR, ch 1, 8 sc in ring, sl st to first sc. (8 sts)
- Round 2: Ch 1, sc in first sc, (ch 3, sc in next sc) 7 times, ch 3, sl st to first sc. (8 sc, 8 ch-3 sps)
- Round 3 (petal layer 1): In each ch-3 sp work (sc, hdc, 3 dc, hdc, sc). Sl st to first sc. (8 petals)
- Round 4: Fold the petals forward. Ch 1, BPsc around the first sc of Round 2, (ch 4, BPsc around next Round 2 sc) 7 times, ch 4, sl st to first BPsc. (8 BPsc, 8 ch-4 loops behind the petals)
- Round 5 (petal layer 2): In each ch-4 loop work (sc, hdc, 5 dc, hdc, sc). Sl st to first sc. (8 petals)
- Round 6: Ch 1, BPsc around first BPsc of Round 4, (ch 5, BPsc around next Round 4 BPsc) 7 times, ch 5, sl st to first BPsc. (8 ch-5 loops)
- Round 7 (petal layer 3): In each ch-5 loop work (sc, hdc, 7 dc, hdc, sc). Sl st to first sc. (8 petals)
- Round 8: Ch 1, BPsc around first BPsc of Round 6, (ch 6, BPsc around next Round 6 BPsc) 7 times, ch 6, sl st to first BPsc. (8 ch-6 loops)
- Round 9 (petal layer 4): In each ch-6 loop work (sc, hdc, 2 dc, 5 tr, 2 dc, hdc, sc). Sl st to first sc. (8 petals, about 10 cm across) Fasten off and leave a 40 cm tail for sewing.
Rolled Bud Center (ivory, make 1 per square)
- Ch 13.
- Row 1: 2 hdc in 3rd ch from hook and 2 hdc in each remaining ch across. (22 hdc) The strip will twist into a ruffled curl as you work.
- Fasten off and leave a 20 cm tail. Roll the strip tightly from one end into a spiral and stitch through the base several times to hold it.
- Sew the bud into the center ring of the flower, over Round 1.
- Embroider 6 French knots in ivory (or a slightly deeper cream if you have it) in a ring around the base of the bud to suggest stamens.
Leaves (sage green, make 4 per square)
- Ch 10.
- Side 1: Sc in 2nd ch from hook, hdc in next ch, dc in each of next 2 ch, tr in next ch, dc in each of next 2 ch, hdc in next ch, 3 sc in last ch (the leaf tip).
- Side 2: Working along the opposite side of the foundation chain, hdc in next ch, dc in each of next 2 ch, tr in next ch, dc in each of next 2 ch, hdc in next ch, sc in last ch. Sl st to first sc. (19 sts)
- Center vein: With the same sage yarn, surface slip stitch from the base to 1 cm short of the tip along the center line of the leaf.
- Fasten off and leave a 15 cm tail for sewing. The leaf measures about 5 cm long.
Filet Center Panel (ivory)
- Round 1: MR, ch 3 (counts as dc), 2 dc in ring, ch 2, (3 dc, ch 2) 3 times, sl st to top of beg ch-3. (12 dc, 4 corner ch-2 sps; 3 dc per side)
- Round 2: Sl st in next 2 dc and into corner sp. Ch 3, (dc, ch 2, 2 dc) in same sp, dc in each of next 3 dc, *(2 dc, ch 2, 2 dc) in next corner sp, dc in each of next 3 dc; rep from * 2 more times, sl st to top of beg ch-3. (28 dc; 7 per side)
- Round 3: Sl st in next dc and into corner sp. Ch 3, (dc, ch 2, 2 dc) in same sp, dc in each dc across to next corner, *(2 dc, ch 2, 2 dc) in corner sp, dc in each dc across; rep from * 2 more times, join. (44 dc; 11 per side)
- Round 4 (mesh): Sl st in next dc and into corner sp. Ch 3, (dc, ch 2, 2 dc) in same sp, (ch 1, sk next dc, dc in next dc) 5 times, ch 1, sk last dc, *(2 dc, ch 2, 2 dc) in corner sp, (ch 1, sk next dc, dc in next dc) 5 times, ch 1, sk last dc; rep from * 2 more times, join. (60 sts including ch-1 sps; 15 per side)
- Round 5 (solid): Sl st in next dc and into corner sp. Ch 3, (dc, ch 2, 2 dc) in same sp, dc in each dc and in each ch-1 sp across, *(2 dc, ch 2, 2 dc) in corner sp, dc in each dc and ch-1 sp across; rep from * 2 more times, join. (76 dc; 19 per side)
- Round 6 (mesh): Sl st in next dc and into corner sp. Ch 3, (dc, ch 2, 2 dc) in same sp, (ch 1, sk next dc, dc in next dc) 9 times, ch 1, sk last dc, *(2 dc, ch 2, 2 dc) in corner sp, (ch 1, sk next dc, dc in next dc) 9 times, ch 1, sk last dc; rep from * 2 more times, join. (92 sts; 23 per side)
- Round 7 (solid): Work as Round 5. (108 dc; 27 per side) The panel measures about 16 cm. Place a marker in each corner sp.
Checkerboard Frame (ivory)
- Round 8: Sl st in next dc and into corner sp. Ch 3, (2 dc, ch 3, 3 dc) in same sp, ch 3, sk next 3 dc, (dc in each of next 3 dc, ch 3, sk next 3 dc) 4 times, *(3 dc, ch 3, 3 dc) in corner sp, ch 3, sk 3, (dc in each of next 3 dc, ch 3, sk 3) 4 times; rep from * 2 more times, join. (132 sts; 33 per side: 6 solid blocks and 5 open blocks per side)
- Round 9 (blocks shift): Sl st in next 2 dc and into corner sp. Ch 3, (2 dc, ch 3, 3 dc) in same sp, ch 3, sk next 3 dc, (3 dc in next ch-3 sp, ch 3, sk next 3 dc) 5 times, *(3 dc, ch 3, 3 dc) in corner sp, ch 3, sk 3 dc, (3 dc in next ch-3 sp, ch 3, sk 3 dc) 5 times; rep from * 2 more times, join. (156 sts; 39 per side) Each solid block now sits above an open block, which makes the checkerboard.
- Round 10 (solid band): Sl st in next 2 dc and into corner sp. Ch 3, (dc, ch 2, 2 dc) in same sp, dc in each dc and 3 dc in each ch-3 sp across, *(2 dc, ch 2, 2 dc) in corner sp, dc in each dc and 3 dc in each ch-3 sp across; rep from * 2 more times, join. (172 dc; 43 per side)
Fan and Picot Edge with Join-As-You-Go (ivory)
- Round 11 (fans): Sl st in next dc and into corner sp. Ch 3 (counts as dc), 8 dc in same sp for the corner fan. *Sc in next dc, (sk 2 dc, 7 dc in next dc, sk 2 dc, sc in next dc) 7 times, 9 dc in corner sp; rep from * 2 more times, then sc in next dc, (sk 2, 7 dc in next, sk 2, sc in next) 7 times, sl st to top of beg ch-3. (264 sts: 4 corner fans of 9 dc, 28 side fans of 7 dc, 32 sc)
- Round 12 (picots), first square only: Ch 1. On the corner fan: sc in first dc, (sc in next dc, picot) 7 times, sc in last dc. *Sl st in next sc. On each side fan: sc in first dc, (sc in next dc, picot) 5 times, sc in last dc, sl st in next sc. Rep for all 7 side fans, then work the next corner fan as before. Continue around and sl st to first sc. Each corner fan has 9 sc and 7 picots; each side fan has 7 sc and 5 picots. Fasten off.
- Joining picot (all squares after the first): Where a square meets a finished neighbor, replace the center picot with a joining picot: ch 1, sl st through the matching picot of the neighbor, ch 1, sl st in first ch. The center picot is the 4th picot of a corner fan and the 3rd picot of a side fan.
- Join each new square to its neighbors on Round 12 along every shared side: 7 side-fan joins per side plus the corner. Where four squares meet, join every corner into the same first-joined corner picot so the junction lies flat.
- Layout: 9 squares across by 11 squares long (99 squares) for a queen bedspread of about 252 x 308 cm before the border.
Bedspread Border (ivory)
- Round 1: Join yarn in the center picot of any outer corner fan of the bedspread. Ch 1, (sc, ch 4, sc) in the same picot. *Ch 4, sc in next free picot; rep from * all the way around. Where two squares meet along the edge, work 1 sc through both joined picots together. Work (sc, ch 4, sc) in the center picot of each of the other 3 outer corners. Sl st to first sc.
- Round 2: Sl st into first ch-4 loop, ch 1, 6 sc in each ch-4 loop around, sl st to first sc. (6 sc per loop)
- Round 3 (border fans): Ch 1. For each 6-sc group: sc in 1st sc, sk 2 sc, 7 dc in next sc (9 dc in the 4 corner loops), sk 2 sc. Rep around and sl st to first sc. (one fan per loop)
- Round 4 (picots): Ch 1. *Sl st in next sc. Sc in first dc of fan, (sc in next dc, picot) 5 times, sc in last dc (on 9-dc corner fans work 7 picots). Rep from * around, sl st to beg and fasten off. The border adds about 3-4 cm on each side.
Finishing
Assemble each square before you join it. Place the flower in the middle of the filet center so it covers the solid Rounds 1-3. Sew it down with the long tail through the back-post rings of Rounds 4, 6 and 8 only. The petals should stay free and lift away from the lace. Tuck the base of each leaf about 1 cm under the outer petal layer, point the leaves along the diagonals toward the four corners, and sew along the bottom third of each leaf so the tips stay loose.
Weave in every end into the solid parts of the square (the center rounds, solid blocks or fans) and not through the mesh, where ends can show. Before joining, lightly spray-block each square to 28 cm, flower side down on a folded towel so the petals don’t flatten. After the border is done, lay the whole bedspread on a clean sheet or blocking mats, mist it, pin out every border fan, and let it dry completely. Don’t iron the flowers. If one gets crushed, steam it from a few centimeters away and reshape it with your fingers.
Tips for Success
- Make the flowers and leaves in batches of 10 to 20 before you start the squares. You’ll get faster with the petal rounds, and every flower will be the same size.
- Use the 3.0 mm hook for the flower and leaves if your petals look floppy. The tighter fabric holds the cupped shape after washing.
- Count each side of the square, not just the round total, on Rounds 8-11. The checkerboard and fan repeats only line up if every side has exactly 27, 33, 39 and 43 stitches.
- Join your squares in rows and keep a joined section flat on a table as you go. That way you’ll see a twisted square or a missed join right away.
- Buy all your ivory yarn from the same dye lot, or alternate between two lots every row of squares. Small differences in shade are very visible on a large white spread.
Common Mistakes to Avoid
- Working the petal-base loops into the front of the petals. Each ch loop round must go around the back post of the previous ring, behind the petals. Otherwise the layers won’t stack and the flower will lie flat.
- Checkerboard blocks stacking straight up instead of alternating. In Round 9, the 3 dc go into the ch-3 spaces and the ch-3 skips the solid blocks. If you see a solid column, you’ve worked into the blocks. Undo the round to the last corner and redo it.
- Cupping or ruffling squares. Fans that ruffle usually mean your Round 10 count is too high. Fans that pull in mean your tension tightened on the edge. Check against 43 dc per side, and go up half a hook size for Rounds 11-12 if needed.
- Joining the wrong picot. If the seams between squares look staggered, you’ve joined the 2nd or 4th picot instead of the center one. Always join the 3rd picot of a side fan and the 4th of a corner fan.
- Sewing the leaves down along their whole length. The leaves then look flat and printed on. Stitch only the base third so the tips lift slightly.
Ways to Customize This Pattern
- Change the size: 5 x 6 squares (about 145 x 175 cm) makes a sofa throw, 7 x 9 a full or double coverlet, and 10 x 11 a king spread.
- Matching pillow shams: join 2 squares side by side for each sham front, add the border, and sew it to a fabric pillowcase with a contrasting lining showing through the mesh.
- Use a blush, dusty rose or pale gold for the flowers instead of ivory, and keep the lace ivory. This works well for a nursery or a wedding gift.
- Make a lighter version: leave the flowers off every other square and work only the filet center there. This saves about a third of the time and gives a checkerboard of plain and flowered squares.
- Make it in fine cotton (sport weight or size 3 thread) with a 2.5-3.0 mm hook for a more delicate, antique-style tablecloth or runner. You’ll need more squares for the same size.
Frequently asked questions
Each blocked square is about 28 cm. A queen bedspread takes 9 x 11 = 99 squares, plus the border. Each finished square uses about 40 g of ivory and 3 g of sage. Multiply by your square count and add about 8 percent of the total for the border and swatching.
Yes, but the look changes. Acrylic is softer and drapes more, so the checkerboard and fans won’t stay as crisp, and the 3D petals may lean over. If you use acrylic, crochet the flowers with the smaller hook and steam-block the lace gently. Don’t steam the flowers.
Hand wash or use a delicate machine cycle in cool water inside a large mesh laundry bag. Then roll it in towels to remove water and dry it flat. Never tumble dry it. While the spread is still damp, plump each flower with your fingers so the petal layers dry standing up.
You can. Work Round 12 the same way on every square, then whipstitch the center picots of the matching fans together with ivory yarn. Joining as you go is faster and gives cleaner arches between the squares, which is why the pattern is written that way.
The finished Elegant White Floral Crochet Bedspread Pattern