Dusty Rose Floral Crochet Bedspread Pattern with Matching Pillow Shams
Beginner Friendly
Perfect for those just starting their crochet journey, with clear instructions and simple techniques
Single-Day Project
A satisfying project you can complete in a single afternoon or evening.
Handmade Gift
A beautiful keepsake — free forever. Read online or print at home.
About This Dusty Rose Floral Crochet Bedspread Pattern with Matching Pillow Shams
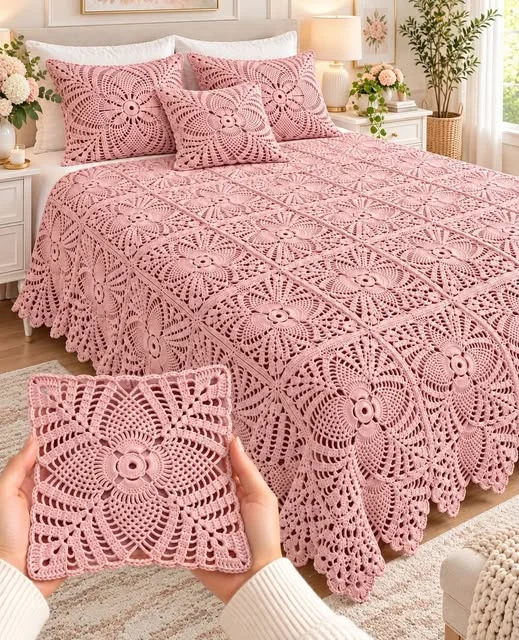
This floral crochet bedspread pattern turns 56 lace squares into a dusty pink heirloom for a queen-size bed. Each square has a raised flower with two layers of petals at its center. Four pineapple panels fan out from the flower toward the sides of the square, and a fine mesh frame keeps every edge straight for joining. Once the squares are joined, a deep scalloped border goes around the whole spread so it falls softly over the sides of the bed.
The set also includes two Euro pillow shams made from the same squares, plus a smaller accent pillow that extends a single motif with mesh rounds. The pieces are sewn onto simple fabric envelope covers, so the lace stays flat and the pillows are easy to wash.
This is a long project. Expect about two hours per square and 120 to 150 hours for the full set, including joining, borders and blocking. It suits crocheters who are comfortable reading lace rounds, counting chain spaces and working back-post stitches. If you have made a pineapple doily before, you already know most of what this pattern asks of you.
Materials
- Sport-weight (fine, #2) mercerized cotton in dusty pink about 1,900 g total (roughly 38-40 balls of 50 g / 125 m); buy one extra ball and keep it all from one dye lot
- Bedspread allowance about 1,550 g (56 squares at ~25 g each, plus the border)
- Pillow allowance about 130 g per Euro sham, 50 g for the accent pillow
- 3.0 mm crochet hook adjust to match gauge
- Tapestry needle blunt tip
- Stitch markers at least 4
- Blocking mats, rust-proof pins and a spray bottle for blocking squares to 30 cm
- Pillow forms 2 x 60 cm Euro, 1 x 40 cm square
- Cotton fabric in dusty pink or ivory about 1.6 m of 140 cm wide fabric, for the envelope covers
- Sewing thread to match the yarn, plus a sewing needle or machine
Abbreviations
MRmagic ringchchainsl stslip stitchscsingle crochethdchalf double crochetdcdouble crochettrtreble crochetBPscback post single crochet: insert the hook from the back, around the post of the stitch, and back outsc2togsingle crochet two together (decrease)spspacest(s)stitch(es)corner shell(3 dc, ch 3, 3 dc) in the same spshell(2 dc, ch 2, 2 dc) in the same spV-st(dc, ch 2, dc) in the same sppicotch 3, sl st in 3rd ch from hookRS / WSright side / wrong sideFlower Lace Square – Center Flower (make 65)
- You need 56 squares for the bedspread, 8 for the two Euro shams and 1 for the accent pillow. Every round is worked with RS facing and is joined with a sl st, with no turning.
- Rnd 1: Make a MR, ch 1, work 8 sc in the ring, pull the ring closed and sl st to the first sc. (8 sc)
- Rnd 2: Ch 3 (counts as dc throughout), work 1 dc in the same st, then 2 dc in each st around. Sl st to the top of ch-3. (16 dc)
- Rnd 3: Ch 1, sc in the same st, ch 3, skip 1 st, then *sc in next st, ch 3, skip 1 st* 7 times. Sl st to the first sc. (8 sc, 8 ch-3 sps)
- Rnd 4 (first petal layer): In each ch-3 sp work (sc, hdc, 3 dc, hdc, sc). Sl st to the first sc. (8 petals)
- Rnd 5: Fold the petals toward you so you are working behind them. Ch 1, BPsc around the first sc of Rnd 3, ch 5, then *BPsc around the next sc of Rnd 3, ch 5* 7 times. Sl st to the first BPsc. (8 BPsc, 8 ch-5 sps)
- Rnd 6 (second petal layer): In each ch-5 sp work (sc, hdc, 5 dc, hdc, sc). Sl st to the first sc. (8 larger petals, which sit staggered behind the first layer)
- Rnd 7: Working behind the Rnd 6 petals, ch 1, BPsc around the first BPsc of Rnd 5, ch 6, then *BPsc around the next BPsc of Rnd 5, ch 6* 7 times. Sl st to the first BPsc. (8 BPsc, 8 ch-6 sps)
Flower Lace Square – Pineapples and Corners
- Rnd 8: Sl st into the first ch-6 sp. Ch 3, then work (2 dc, ch 3, 3 dc) in the same sp. This is the first corner shell. Ch 2, work 9 tr in the next ch-6 sp (this is a pineapple base), ch 2. Then *corner shell in next ch-6 sp, ch 2, 9 tr in next ch-6 sp, ch 2* 3 times. Sl st to the top of ch-3. (4 corner shells, 4 groups of 9 tr)
- From here on, start each round by sl st across the next 2 dc and into the corner ch-3 sp. Ch 3 counts as the first dc of the corner shell, and each round ends with a sl st to the top of the beginning ch-3. The instructions below give one side; work the bracketed repeat 4 times per round.
- Rnd 9: [Corner shell in corner sp, ch 3, skip ch-2 sp, tr in first tr, (ch 1, tr in next tr) 8 times, ch 3, skip ch-2 sp]. (9 tr and 8 ch-1 sps per pineapple)
- Rnd 10: [Corner shell in corner sp, ch 3, sc in first ch-1 sp of pineapple, (ch 3, sc in next ch-1 sp) 7 times, ch 3]. (7 ch-3 loops per pineapple)
- Rnd 11: [Corner shell in corner sp, ch 2, V-st in next ch-3 sp, ch 2, sc in first pineapple loop, (ch 3, sc in next loop) 6 times, ch 2, V-st in next ch-3 sp, ch 2]. (6 loops per pineapple)
- Rnd 12: [Corner shell in corner sp, ch 2, shell in ch-2 sp of V-st, ch 3, sc in first pineapple loop, (ch 3, sc in next loop) 5 times, ch 3, shell in ch-2 sp of next V-st, ch 2]. (5 loops)
- Rnd 13: [Corner shell in corner sp, ch 2, shell in next shell sp, ch 3, sc in first loop, (ch 3, sc in next loop) 4 times, ch 3, shell in next shell sp, ch 2]. (4 loops)
- Rnd 14: Work as Rnd 13, but repeat “(ch 3, sc in next loop)” 3 times. (3 loops)
- Rnd 15: Work as Rnd 13, but repeat “(ch 3, sc in next loop)” 2 times. (2 loops)
- Rnd 16: Work as Rnd 13, but repeat “(ch 3, sc in next loop)” once. (1 loop, the pineapple tip)
- Rnd 17: [Corner shell in corner sp, ch 2, shell in next shell sp, ch 2, sc in the tip loop, ch 2, shell in next shell sp, ch 2]. Each pineapple is now closed.
Flower Lace Square – Squaring Off and Mesh Frame
- Rnd 18: [Corner shell in corner sp, dc in each of next 3 dc, 2 dc in ch-2 sp, dc in next 2 dc, 2 dc in shell sp, dc in next 2 dc, 2 dc in ch-2 sp, dc in sc, 2 dc in ch-2 sp, dc in next 2 dc, 2 dc in shell sp, dc in next 2 dc, 2 dc in ch-2 sp, dc in next 3 dc]. (33 dc per side between corner ch-3 sps, 132 dc in total)
- Rnd 19: [(2 dc, ch 3, 2 dc) in corner sp, ch 1, skip next dc, (dc in next dc, ch 1, skip next dc) 16 times]. (16 mesh dc and 17 ch-1 sps per side)
- Rnd 20: Sl st into the corner sp and ch 1. Then [(2 sc, ch 2, 2 sc) in corner sp, sc in each dc and each ch-1 sp across the side]. Sl st to the first sc. (41 sc per side between the corner ch-2 sps)
- Fasten off and weave in the ends. Pin the square to 30 x 30 cm, mist it until damp and let it dry fully. Shape the petals by hand so they stand up; do not pin through them.
Joining the Bedspread
- Lay out 56 blocked squares in 8 rows of 7 squares, all with RS up.
- Horizontal seams: Take row 1 and row 2 and fold them RS together, so that each square in row 1 sits on top of the square below it. Join yarn in a corner ch-2 sp of both layers.
- Working through the back loops of both layers, sl st in the corner sps, sl st in each of the 41 sc, then sl st in the next corner sps. Without fastening off, move on to the next pair of squares and continue until the full seam is joined. Join every row to the next in the same way, giving 7 horizontal seams.
- Vertical seams: Work the 6 long seams between the columns in the same way. Where four corners meet, work over the earlier seam with one sl st so the intersection lies flat.
- Check the back of the work. The seams should form neat ridges on the WS and be nearly invisible on the RS.
Scalloped Border
- Rnd B1: With RS facing, join yarn in any outer corner sp. Ch 1, then work around the whole spread: 3 sc in each outer corner sp, sc in each sc, and 1 sc in each square’s corner ch-2 sp at the seams (2 sc per seam). You should have 299 sc along each 7-square side and 342 sc along each 8-square side between the corner groups. Sl st to the first sc.
- Rnd B2: Ch 1, then sc in each st around, working 1 sc in each corner center st. Space sc2tog decreases evenly so that the stitch count between corner center sts is 297 on each short side (4 decreases) and 337 on each long side (7 decreases). Sl st to the first sc.
- Rnd B3: Sl st to the next corner center st. Ch 3, then 8 dc in the same st (corner fan). For the side: sc in next st, then (skip 3 sts, 7 dc in next st, skip 3 sts, sc in next st) across. That is 37 times on short sides and 42 times on long sides, ending in the st just before the next corner. Work 9 dc in each corner center st and repeat the side instructions around. Sl st to the top of ch-3.
- Rnd B4: Ch 4 (counts as dc and ch 1). For corner fans: (dc in next dc, ch 1) 7 times, then dc in last dc. Between fans: ch 2, sc in sc, ch 2. For side fans: (dc in next dc, ch 1) 6 times, dc in last dc. Repeat around and sl st to the 3rd ch of ch-4.
- Rnd B5: Ch 1. In every ch-1 sp of every fan, work (sc, picot, sc). Between fans, skip the ch-2 sp, sl st in the sc and skip the next ch-2 sp. Sl st to the first sc and fasten off.
- Wet-block the whole bedspread flat, pinning each scallop to a point. Let it dry completely before you lift it.
Euro Pillow Shams (make 2)
- For each sham, block 4 squares and join them 2 x 2 using the joining method above.
- Rnd B1: Work as for the bedspread. You should have 84 sc per side between the corner groups (2 x 41 sc, plus 2 sc at the center seam).
- Rnd B2: Sc around, working sc2tog 5 times evenly on each side, so there are 81 sts between corner center sts.
- Rnd B3: Work 9 dc in each corner center st. On each side, sc in next st, then (skip 3, 7 dc in next st, skip 3, sc in next st) 10 times.
- Rnds B4–B5: Work as for the bedspread border, then fasten off and block.
- Cover: Cut one 62 x 62 cm front and two 62 x 44 cm back panels. Hem one long edge of each back panel with a 2 cm double hem. Lay the backs over the front, RS together, with the hemmed edges overlapping. Sew all around with a 1 cm seam allowance, then turn the cover RS out.
- Center the crochet panel on the front of the cover. Hand-sew it in place along Rnd B1 so the scallops hang free over the edge, then insert the 60 cm form.
Accent Pillow
- Take 1 blocked square. With RS facing, join yarn in a corner ch-2 sp.
- Rnd E1: Ch 3, then work (dc, ch 3, 2 dc) in the same sp. Along each side: ch 1, skip 1 sc, then (dc in next sc, ch 1, skip 1 sc) 20 times. Work (2 dc, ch 3, 2 dc) in each corner sp. Sl st to the top of ch-3. (20 mesh dc per side)
- Rnds E2–E4: Sl st to the corner sp and work (2 dc, ch 3, 2 dc) in each corner sp. Along each side: ch 1, skip the first corner dc, then dc in each dc and ch 1 over each ch-1 sp. Finish the side with ch 1, skipping the last corner dc. Each round adds 2 mesh dc per side, giving 22, then 24, then 26.
- Rnd E5: Ch 1, then work (2 sc, ch 2, 2 sc) in each corner sp, and sc in each dc and each ch-1 sp. (57 sc per side between the corner groups)
- Rnd E6: Ch 1. Along each side, (sc in next 3 sc, picot) 20 times, then sc in next sc. Work (sc, picot, sc) in each corner ch-2 sp. Sl st to the first sc and fasten off. Block the panel to about 40 cm.
- Make the cover as for the shams, using a 42 x 42 cm front and two 42 x 32 cm back panels. Sew the lace along Rnd E5 and insert the 40 cm form.
Finishing
Weave in every end along the back of a solid stitch rather than through the mesh, where it would show through the holes. Leave at least 8 cm per end before trimming, because cotton has little grip and short ends can work loose after washing.
When everything is dry, lay the bedspread over the bed with the scalloped border dropping evenly on both sides and at the foot. Place the two Euro shams against the headboard and the accent pillow in front of them. Fluff each 3D flower with your fingers so the two petal layers sit apart and catch the light.
Tips for Success
- Make the squares in batches of 8 and block each batch together on the same mats. This keeps the sizing consistent across all 65 squares.
- Place a stitch marker in each corner ch-3 sp on Rnds 9 to 17. The pineapples shrink by one loop each round, and the markers let you confirm at a glance that all four sides still match.
- On Rnds 5 and 7, push the petals firmly forward with your thumb before inserting the hook. The back-post stitches must go around the post of the earlier stitch, not into the petals.
- Keep the yarn in a bowl and wind each new ball into a center-pull cake. Mercerized cotton tangles easily and kinks when it is pulled from the outside of a ball.
- Count the 41 sc on each side of every finished square before blocking. A side that is one stitch off will show as a wavy seam later.
Common Mistakes to Avoid
- Working the Rnd 6 petals into the Rnd 4 petals. Fix: Rnd 6 goes only into the ch-5 sps of Rnd 5. If your second petal layer sits directly on top of the first one, frog back to Rnd 5.
- Skipping the ch-3 sp between the corner shell and the pineapple on Rnd 11. Fix: the V-sts go into that space. Without them the corners lose width, and the square will cup or come out diamond-shaped.
- Joining squares with one of them turned WS out. Fix: before each seam, check that both squares show the raised flower on the outside of the fold.
- Working the border too tightly, so the edge pulls in and the corners curl. Fix: go up 0.25 mm for Rnds B3 to B5 only, or recheck that you made the full number of decreases on Rnd B2.
- Using two dye lots side by side. Fix: if you must use a second lot, alternate balls from the old and new lots every few squares, so the color shift spreads across the whole spread instead of forming a visible band.
Ways to Customize This Pattern
- Change the bed size: use 5 x 7 squares for a twin, 6 x 7 for a full or 9 x 8 for a king. Then recount Rnd B1 and set the decreases on Rnd B2 so each side lands on a multiple of 8 plus 1.
- Two-tone flowers: work Rnds 1 to 6 in ivory or a deeper rose, then switch to dusty pink at Rnd 7. The color change sits behind the petals, so it stays hidden.
- Make a throw instead of a bedspread: 4 x 5 squares with the same border makes a 130 x 160 cm sofa blanket in about 45 hours.
- Add a lining: tack the finished bedspread to a sheet in a contrasting shade, such as cream or sage. The lace pattern stands out much more clearly against the color.
- Make a table runner: join 2 x 5 squares, add the scalloped border, and you have a matching runner for a dresser or dining table.
Frequently asked questions
Yes. DK cotton with a 4.0 mm hook gives squares of about 38 cm, so a 6 x 7 layout covers a queen bed with only 42 squares. The lace will look heavier and the bedspread will weigh noticeably more, so allow about 25% more yarn by weight.
Pin only the mesh frame and the corners, never the petals. Mist the square from above, then lift each petal layer with your fingertips while it is still damp. Do not steam-press the flowers, because the heat flattens them permanently.
Mercerized cotton can go in the machine on a cold, gentle cycle inside a large mesh laundry bag. Lay the bedspread flat to dry and reshape the scallops while it is damp. Never tumble dry it, because the lace stretches under its own weight when it is hot and wet.
Slip-stitch seams let you block every square to an identical size before you join anything. With 56 squares, small tension changes between your first square and your last are almost certain. Blocking first hides those differences, which join-as-you-go would lock in.
The finished Dusty Rose Floral Crochet Bedspread Pattern with Matching Pillow Shams