Burgundy and Cream Floral Crochet Bedspread Pattern
Beginner Friendly
Perfect for those just starting their crochet journey, with clear instructions and simple techniques
Single-Day Project
A satisfying project you can complete in a single afternoon or evening.
Handmade Gift
A beautiful keepsake — free forever. Read online or print at home.
About This Burgundy and Cream Floral Crochet Bedspread Pattern
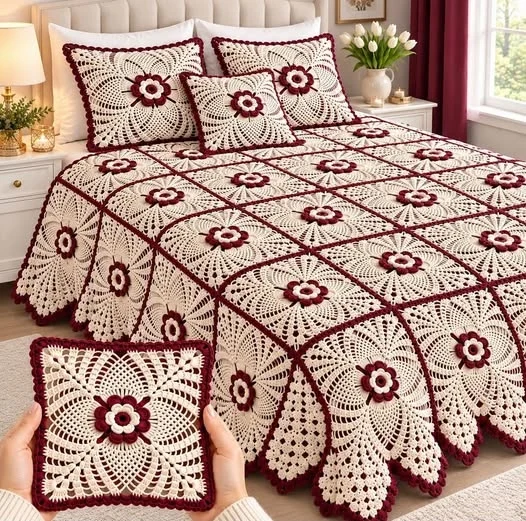
This burgundy and cream floral crochet bedspread pattern builds a full bed set from a single lace square. Each cream square is worked from the center out in open granny rounds, finished with a ring of fans, and topped with a three-layer 3D flower in deep burgundy with a cream center. A burgundy edging round on every square turns the joins into the dark lines you see running across the finished blanket.
The same square makes the matching pillows, so the whole set stays consistent. Squares are blocked, joined into strips, then joined into the full bedspread and finished with a scalloped burgundy shell border. It is an advanced project because of the layered flowers, the fan round, the exact stitch counts needed at the joins, and the sheer number of squares.
Plan on 180 to 250 hours for the full set, since you will make 128 squares and 119 flowers. It suits crocheters who enjoy repeating a motif and want a family heirloom. If you want a shorter project, the same square makes a throw or a single cushion.
Materials
- 4-ply / sport weight mercerized cotton, cream about 4 kg for the full set (estimate)
- 4-ply / sport weight mercerized cotton, burgundy about 2.2 kg (estimate)
- 3.25 mm crochet hook adjust to hit a 20 cm square
- Tapestry needle
- Stitch markers
- Polyester fiberfill a small pinch per flower center
- Blocking mats and rust-proof pins
- Pillow forms two 40 cm and one 20 cm
- Scissors
Abbreviations
MRmagic ringchchainsl stslip stitchscsingle crochetsc2togsingle crochet 2 together (decrease)hdchalf double crochetdcdouble crochetspspacest(s)stitch(es)inc2 sc in the same stitchRS / WSright side / wrong sideFlower, Back Layer (Burgundy, make 119)
- 8 sc in MR, join with a sl st to the first sc. (8)
- *Sc in the next st, ch 3*, repeat 8 times, join. (8 sc and 8 ch-3 sps)
- In each ch-3 sp work (sl st, hdc, 3 dc, hdc, sl st) to make a petal. Join and fasten off, leaving a 20 cm tail. (8 petals)
Flower, Middle Layer (Burgundy, make 119)
- 6 sc in MR, join. (6)
- *Sc in the next st, ch 3*, repeat 6 times, join. (6 sc and 6 ch-3 sps)
- In each ch-3 sp work (sl st, hdc, 2 dc, hdc, sl st). Join and fasten off, leaving a 20 cm tail. (6 petals)
Flower Center (Cream, make 119)
- 6 sc in MR. (6)
- Inc in each st around. (12)
- Sc in each st around. (12)
- *Sc2tog* 6 times. (6) Stuff lightly with a pinch of fiberfill.
- Fasten off, thread the tail through the front loops of all 6 sts, pull closed and secure.
Lace Square (Cream, make 128)
- Ch 5, sl st into the first ch to form a ring. Ch 3 (counts as a dc), 2 dc in the ring, *ch 2, 3 dc in the ring*, repeat 3 times, ch 2, join with a sl st to the top of the beginning ch-3. (4 groups of 3 dc, 4 ch-2 corner sps, 12 dc)
- Sl st across to the first ch-2 sp. Ch 3, (2 dc, ch 2, 3 dc) in the same sp, ch 1. *(3 dc, ch 2, 3 dc) in the next corner sp, ch 1*, repeat twice more, join. (8 groups, 4 ch-1 sps, 24 dc)
- Sl st to the corner sp. Ch 3, (2 dc, ch 2, 3 dc) in the corner. *Ch 1, 3 dc in the next ch-1 sp, ch 1, (3 dc, ch 2, 3 dc) in the next corner*, repeat to the end, ch 1, 3 dc in the last ch-1 sp, ch 1, join. (12 groups, 36 dc)
- Repeat Rnd 3, working 3 dc in every ch-1 sp along each side, with ch 1 between every group and (3 dc, ch 2, 3 dc) in each corner. (16 groups, 48 dc)
- Repeat Rnd 3 once more. (20 groups, 60 dc)
- Repeat Rnd 3 once more. Each side now has 6 groups and 5 ch-1 sps. (24 groups, 72 dc)
- Ch 1. Sc in each dc and in each ch-1 sp, and work 3 sc in each corner ch-2 sp. Join. (104 sc, 26 per side)
- Sl st in each st to the center sc of a corner (the 2nd of the 3 corner sc). Work 7 dc in that st. *Sl st in the next st. Then repeat 6 times: skip 1 st, 5 dc in the next st, skip 1 st, sl st in the next st. Work 7 dc in the center sc of the next corner.* Repeat from * around and join. Each side has 6 five-dc fans, each corner has a 7-dc fan, and every fan is separated by a sl st. (176 sts, 44 per side)
- Change to burgundy and join in the center dc of any corner fan. Ch 1, sc in the same st and in every st around, including the sl sts. Join and fasten off. (176 sc, 44 per side)
Assembling the Flowers
- Stack the middle layer on the back layer so the 6 petals sit between the 8 petals, not on top of them.
- Place the cream center on top. Use the burgundy tails to sew all three layers together through the middle, going back and forth several times so the center sits proud.
- Sew the flower over the ring in Rnd 1 of the square, then secure it with a few stitches on the back.
- Make flowers for 110 bedspread squares and 9 pillow-front squares. The 9 pillow-back squares stay plain.
Blocking and Joining the Bedspread
- Wet block every square, pinning it to 20 cm, and let it dry fully.
- Hold two squares with wrong sides together. With burgundy, sl st through the back loops of both squares in each of the 44 sts along one side. Fasten off. Do a test join first and decide which side you prefer as the right side.
- Join 11 squares into a strip. Make 10 strips.
- Join the strips side by side with the same sl st seam so the burgundy seams run in a grid. At every four-corner junction, work the sl sts evenly across both fans so the grid lies flat.
- Count the stitches along each outer edge and write them down before starting the border.
Scalloped Border (Burgundy)
- With RS facing, join burgundy at the center st of an outer corner. Ch 1, sc in each st along the two long sides and the foot, with 3 sc in the center st of each outer corner. Join.
- Count the sts between each pair of corner center sts. For the shells to fit, that count must be 5 more than a multiple of 6 (for example 5, 11, 17, 23). Adjust by working sc2tog or inc evenly along the side.
- Shell round: sl st to the center sc of a corner, 5 dc in that sc. *Skip 2 sts, sl st in the next st, skip 2 sts, 5 dc in the next st*, repeat to the next corner and place 5 dc in its center sc.
- Repeat from * around and join. Fasten off. Each shell center falls 6 sts after the previous one.
Pillow Covers
- For each 40 cm pillow, join 4 flowered squares in a 2 x 2 block for the front, and 4 plain squares in a 2 x 2 block for the back.
- For the 20 cm pillow, use one flowered square for the front and one plain square for the back.
- Place the front and back with wrong sides together. With burgundy, sl st through the back loops of both layers along three sides, working 3 sl sts in each corner. Insert the pillow form.
- Sl st the fourth side closed.
- Work the same scalloped border around the whole pillow, using the stitch-count rule above to fit the shells to each side.
Finishing
Weave in every end on the wrong side, running each tail through at least three stitches in a different direction so it cannot work loose. Give the finished bedspread a final light steam block, pinning the shell border into scallops so each one stays rounded. Check the flowers once more and re-secure any petal that flips back. Wash by hand in cool water, lay flat and reshape while damp, and never wring the cotton.
Tips for Success
- Block one test square before you commit to the whole project, and measure it wet and dry so you know how much it relaxes.
- Work all burgundy rounds in the same dye lot, and buy about 10 percent extra of both colors.
- Make the flowers in batches while you watch something, then sew them on after blocking so the petals stay crisp.
- Mark the center sc of each corner on the fan round. A missed corner will throw off the shell count on the whole border.
- Join squares in the same direction every time so the seam ridges all face the same way.
Common Mistakes to Avoid
- Counting corners as ch-1 sps in Rnds 3 to 6. Fix: each corner is (3 dc, ch 2, 3 dc), and only the sides use ch 1.
- Skipping the sl st at the end of each fan. Fix: it anchors the fan and keeps Rnd 9 at exactly 176 sts, so go back to the last fan where the count went wrong.
- Dark burgundy dye bleeding onto cream. Fix: wash a test swatch with white fabric before you buy the yarn.
- Sewing the flower layers on top of each other without offsetting. Fix: sew the 6-petal layer between the 8 petals so the flower looks full.
- Starting the shell border without checking the stitch count. Fix: adjust the sc count along every side before working the first shell.
Ways to Customize This Pattern
- Make a throw: 5 x 6 squares gives about 100 x 120 cm.
- Swap the colors, for example navy with ivory, or sage with cream.
- Work the flower in a single color for a simpler look, or add a small cream bead center in a contrast shade.
- Leave the pillow backs plain to save yarn and time.
- Use a thicker cotton and a larger hook to get a bigger square, then reduce the number of squares to match.
Frequently asked questions
This pattern uses 110 squares in a 10 x 11 grid, which gives about 200 x 220 cm with drops. Add 18 squares for the three pillows.
Yes, but the square size and yardage will change. Make one test square, measure it, and recalculate the number of squares and the amount of yarn you need.
The shell repeat needs a stitch count that is 5 more than a multiple of 6 between corner centers. Count each side, then add or decrease a few stitches evenly in the first border round.
The finished Burgundy and Cream Floral Crochet Bedspread Pattern