Autumn Pumpkin Door Hanger with 3D Sunflowers, Fall Leaves, Mini Pumpkins and Acorns
Beginner Friendly
Perfect for those just starting their crochet journey, with clear instructions and simple techniques
Single-Day Project
A satisfying project you can complete in a single afternoon or evening.
Handmade Gift
A beautiful keepsake — free forever. Read online or print at home.
About This Autumn Pumpkin Door Hanger with 3D Sunflowers, Fall Leaves, Mini Pumpkins and Acorns
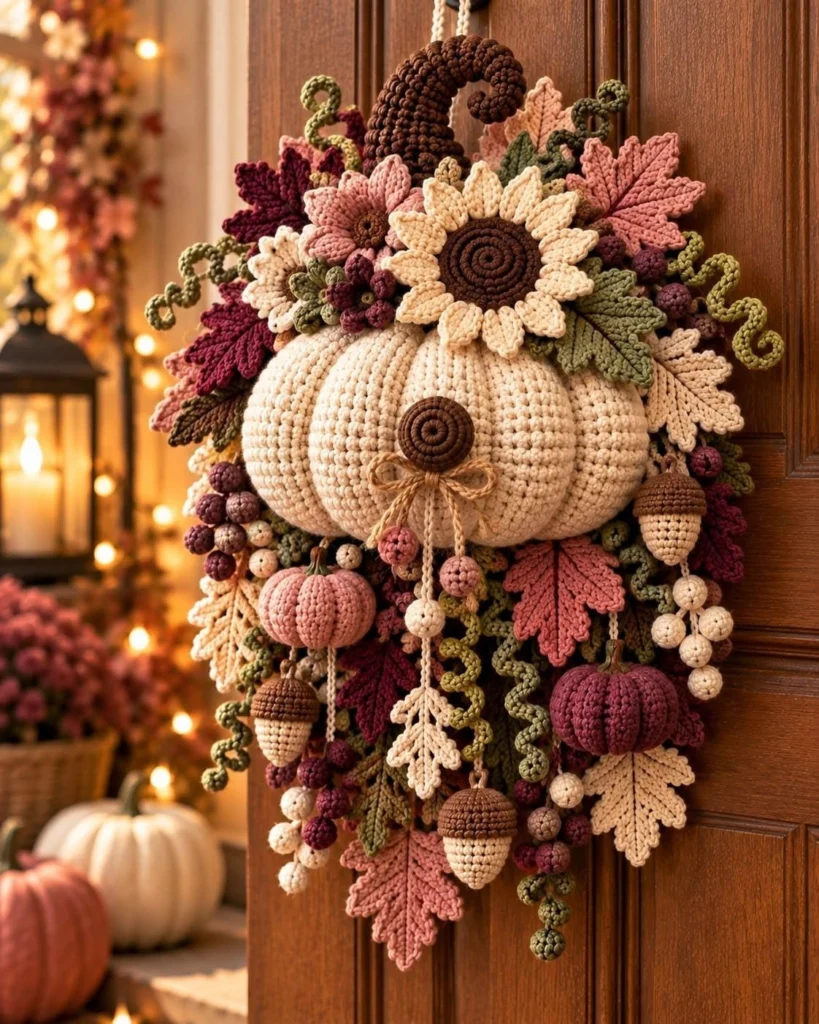
This crochet pumpkin door hanger pattern builds a full autumn arrangement around one plump cream pumpkin. A curling chocolate-brown stem rises from the top, and a layered sunflower and a dusty pink bloom sit across its shoulders. Below it, cascades of lobed maple leaves, corkscrew tendrils, berry clusters, two mini pumpkins and four acorns spill down the door. Everything is mounted on a stiffened crocheted backing panel, so the piece keeps its shape and hangs flat instead of sagging.
The palette is soft and muted: cream, burgundy, dusty pink, mauve, sage green and brown. That makes it feel warmer and more elegant than the usual bright orange fall decor. The construction draws on several techniques. The large pumpkin is a shaped sphere with wrapped ribs. The flowers use two-layer petals worked into the front and back loops of the same round. The spiral centers come from working in the back loop only, and the leaves get serrated points worked around a foundation chain. The stem has craft wire inside so you can bend it into its signature curl.
Expect around 25 to 30 hours from start to finish, most of it spent on the many small pieces. The pattern suits a crocheter who is comfortable with working in the round, invisible decreases and sewing up amigurumi, and who enjoys a long project made of small, satisfying components. It makes a striking gift for anyone who decorates their front door for the seasons, and it will last for years.
Materials
- Worsted weight cotton or cotton-blend yarn, cream about 300 g (large pumpkin, petals, leaves, berries, acorns, hanging cords)
- Worsted weight yarn, chocolate brown about 200 g (backing panel, stems, spiral centers, acorn caps)
- Worsted weight yarn, dusty pink about 100 g
- Worsted weight yarn, burgundy about 100 g
- Worsted weight yarn, sage green about 100 g
- Worsted weight yarn, mauve about 25 g (berries, flower centers)
- 3.5 mm crochet hook for the pumpkins, stem, acorns, berries and spiral centers
- 4 mm crochet hook for the backing panel, leaves, flowers and tendrils
- Polyester fiberfill about 250 g
- Plastic canvas at least 20 x 40 cm, or two standard sheets laced together
- Craft wire, 18-20 gauge about 40 cm, for the curled stem
- Natural jute twine about 50 cm, for the bow
- Tapestry needle, stitch markers, sewing pins and scissors
- Spray starch or fabric stiffener optional, for blocking the leaves
Abbreviations
MRmagic ringchchainsl stslip stitchscsingle crochethdchalf double crochetdcdouble crochettrtreble crochetinc2 sc in the same stitchdecinvisible decrease (sc2tog through front loops)BLOback loop onlyFLOfront loop onlyskskippicotch 3, sl st in 3rd ch from hookpointch 3, sl st in 2nd ch from hook, sc in next chRndroundst(s)stitch(es)FOfasten offBacking Panel (make 2, brown, 4 mm hook)
- Ch 41.
- Rnd 1: Starting in 2nd ch from hook, sc in next 39 ch, 3 sc in last ch. Rotate and work along the opposite side of the chain: sc in next 38 ch, 2 sc in last ch (this is the ch holding the first sc). (82)
- Rnd 2: Inc, 38 sc, inc x3, 38 sc, inc x2. (88)
- Rnd 3: Sc, inc, 38 sc, (sc, inc) x3, 38 sc, (sc, inc) x2. (94)
- Rnd 4: 2 sc, inc, 38 sc, (2 sc, inc) x3, 38 sc, (2 sc, inc) x2. (100)
- Rnds 5–16: Continue the same way, working one more sc before each inc on every round. The 38-st sides never change. Rnd 16 reads: 14 sc, inc, 38 sc, (14 sc, inc) x3, 38 sc, (14 sc, inc) x2. (172) Each round adds 6 sts.
- FO the first panel. Do not fasten off the second panel.
- Cut the plastic canvas about 1 cm smaller than the panel all around. Sandwich it between the two panels, wrong sides facing in.
- Rnd 17 (joining): Working through both panels at once, sc in each st around. (172) Sl st to the first st and FO.
Hanging Loop (cream, 4 mm hook)
- With cream held double, ch 60.
- Sl st in 2nd ch from hook and in each ch across. (59)
- FO with long tails. Sew each end firmly to the back of the panel, about 4 cm below the top edge and 6 cm apart. Stitch through the plastic canvas.
Large Pumpkin (cream, 3.5 mm hook)
- Rnd 1: 6 sc in MR. (6)
- Rnd 2: Inc x6. (12)
- Rnd 3: (Sc, inc) x6. (18)
- Rnds 4–15: Increase 6 sts each round by working one more sc between the increases each time. Rnd 4: (2 sc, inc) x6 (24). Rnd 5: (3 sc, inc) x6 (30). Continue to Rnd 15: (13 sc, inc) x6 (90).
- Rnds 16–23: Sc around. (90) Work 8 rounds even; this short straight section gives the pumpkin its squat shape.
- Rnd 24: (13 sc, dec) x6. (84)
- Rnds 25–35: Decrease 6 sts each round by working one fewer sc between the decreases each time. Rnd 25: (12 sc, dec) x6 (78). Continue to Rnd 35: (2 sc, dec) x6 (18). Start stuffing at Rnd 30. Fill firmly through the top and middle, but keep the back third softer so it sits flat against the panel.
- Rnd 36: (Sc, dec) x6. (12) Top up the stuffing.
- Rnd 37: Dec x6. (6) FO and close the hole with the tail.
- Ribs: Thread a 3 m length of cream yarn and bring it up from the bottom center to the magic ring at the top. Take it down the outside and back up through the bottom center. Repeat 8 times, spacing the wraps evenly so you get 8 segments. Pull each wrap snug enough to make a clear indent, then knot securely at the bottom.
Curled Stem (brown, 3.5 mm hook)
- Rnd 1: 6 sc in MR. (6)
- Rnd 2: Inc x6. (12)
- Rnd 3: (Sc, inc) x6. (18)
- Rnd 4: (2 sc, inc) x6. (24)
- Rnd 5: Sc in BLO around. (24) This turns the base upward.
- Rnds 6–8: Sc around. (24)
- Rnd 9: (2 sc, dec) x6. (18)
- Rnds 10–13: Sc around. (18)
- Rnd 14: (7 sc, dec) x2. (16)
- Rnds 15–17: Sc around. (16)
- Rnd 18: (6 sc, dec) x2. (14)
- Rnds 19–21: Sc around. (14) Stuff the base firmly up to this point.
- Rnd 22: (5 sc, dec) x2. (12)
- Rnds 23–25: Sc around. (12)
- Rnd 26: (4 sc, dec) x2. (10)
- Rnds 27–29: Sc around. (10)
- Rnd 30: (3 sc, dec) x2. (8)
- Rnds 31–38: Sc around. (8)
- Bend over 1 cm at each end of a 35 cm piece of craft wire, then wrap the wire thinly in fiberfill. Push it down through the stem until it reaches the stuffed base.
- Rnd 39: Dec x4. (4) FO and close. Bend the top third of the stem into a forward-curling hook.
Spiral Centers (make 2, brown, 3.5 mm hook)
- One center goes on the sunflower and one goes on the front of the large pumpkin.
- Rnd 1: 6 sc in MR. (6)
- Rnd 2: Inc x6 in BLO. (12)
- Rnd 3: (Sc, inc) x6 in BLO. (18)
- Rnd 4: (2 sc, inc) x6 in BLO. (24)
- Rnd 5: (3 sc, inc) x6 in BLO. (30) The unused front loops form a raised spiral line.
- Rnd 6: Sc in both loops around. (30) FO, leaving a long tail. The disc will cup slightly.
Sunflower (cream, 4 mm hook)
- Rnd 1: 6 sc in MR. (6)
- Rnd 2: Inc x6. (12)
- Rnd 3: (Sc, inc) x6. (18)
- Rnd 4: (2 sc, inc) x6. (24)
- Rnd 5: (3 sc, inc) x6. (30)
- Rnd 6: (4 sc, inc) x6. (36)
- Rnd 7 (front petals, worked in FLO of Rnd 6): Sl st in first st. *Ch 8. Starting in 2nd ch from hook, work sl st, sc, hdc, dc, dc, hdc, sc (7 sts). Sk next st and sl st in next st.* Repeat from * 18 times; the last sl st lands in the first st. (18 petals)
- Rnd 8 (back petals, worked in the BLO of Rnd 6 behind the front petals): Join with a sl st in the 2nd st so the back petals sit between the front ones. *Ch 10. Starting in 2nd ch from hook, work sl st, sc, hdc, dc, tr, tr, dc, hdc, sc (9 sts). Sk next st and sl st in next st.* Repeat from * 18 times. (18 petals) FO.
- Place one spiral center over Rnds 1–5. Tuck a small pinch of fiberfill underneath to dome it, then whipstitch the edge down.
Layered Bloom (make 2: 1 dusty pink with brown center, 1 cream with sage center; 4 mm hook)
- With the center color, Rnd 1: 6 sc in MR. (6)
- Rnd 2: Inc x6 in BLO. (12)
- Rnd 3: (Sc, inc) x6 in BLO. (18) Change to the petal color on the last st.
- Rnd 4 (front petals, in FLO of Rnd 3): Sl st in first st. *Ch 6. Starting in 2nd ch from hook, work sl st, sc, hdc, dc, hdc (5 sts). Sk next st and sl st in next st.* Repeat from * 9 times. (9 petals)
- Rnd 5 (back petals, in BLO of Rnd 3): Join in the 2nd st. *Ch 7. Starting in 2nd ch from hook, work sl st, sc, hdc, dc, dc, hdc (6 sts). Sk next st and sl st in next st.* Repeat from * 9 times. (9 petals) FO.
- Sew 3 French knots in mauve to the center of the pink bloom.
Small Blossoms (make 5: 4 burgundy, 1 dusty pink; 4 mm hook)
- MR. *Ch 2, 2 dc into the ring, ch 2, sl st into the ring.* Repeat from * 5 times. (5 petals)
- Pull the ring closed tightly and FO.
- Work a French knot in mauve or cream at the center.
Maple Leaves (4 mm hook)
- Make large leaves in these colors: 3 burgundy, 3 dusty pink, 3 cream and 2 sage. Make small leaves in these colors: 3 burgundy, 3 dusty pink, 3 cream and 4 sage.
- Small leaf, Rnd 1: Ch 13. Starting in 2nd ch from hook, work sc, hdc, dc in next 2 ch, tr in next 4 ch, dc in next 2 ch, hdc (11 sts). Work 3 sc in the last ch. Rotate and work along the opposite side: hdc, dc in next 2 ch, tr in next 4 ch, dc in next 2 ch, hdc. In the tip ch, work sc and a picot. Sl st to the first sc. (25 sts, not counting the picot)
- Small leaf, Rnd 2: (Sl st in next 2 sts, point) x5. Sl st in next st, then make the stem: ch 7, sl st in 2nd ch from hook and in next 5 ch. Sl st in next 2 sts. (Point, sl st in next 2 sts) x5. Sl st in the tip sc and FO. (10 points)
- Large leaf, Rnd 1: Ch 17. Starting in 2nd ch from hook, work sc, hdc, dc in next 2 ch, tr in next 8 ch, dc in next 2 ch, hdc (15 sts). Work 3 sc in the last ch. Along the opposite side: hdc, dc in next 2 ch, tr in next 8 ch, dc in next 2 ch, hdc. In the tip ch, work sc and a picot. Sl st to the first sc. (33 sts)
- Large leaf, Rnd 2: (Sl st in next 2 sts, point) x7. Sl st in next st, then ch 7, sl st in 2nd ch from hook and in next 5 ch. Sl st in next 2 sts. (Point, sl st in next 2 sts) x7. Sl st in the tip sc and FO. (14 points)
- Vein: With a darker shade, or with the leaf color for a subtle look, work surface slip stitches along the center chain from the stem to the tip.
- Pin each leaf flat, mist with spray starch and let dry.
Corkscrew Tendrils (sage green, 4 mm hook)
- Long tendril (make 5): Ch 31. Work 3 sc in 2nd ch from hook and in each ch across. (90) FO.
- Short tendril (make 6): Ch 21. Work 3 sc in 2nd ch from hook and in each ch across. (60) FO.
- Twist each tendril between your fingers to set the curl.
Mini Pumpkins (make 2: 1 dusty pink, 1 burgundy; 3.5 mm hook)
- Rnd 1: 6 sc in MR. (6)
- Rnd 2: Inc x6. (12)
- Rnd 3: (Sc, inc) x6. (18)
- Rnd 4: (2 sc, inc) x6. (24)
- Rnd 5: (3 sc, inc) x6. (30)
- Rnds 6–11: Sc around. (30)
- Rnd 12: (3 sc, dec) x6. (24)
- Rnd 13: (2 sc, dec) x6. (18) Stuff firmly.
- Rnd 14: (Sc, dec) x6. (12)
- Rnd 15: Dec x6. (6) FO and close.
- Ribs: Wrap matching yarn from top to bottom 6 times, pulling each wrap snug to form 6 segments.
- Stem (brown): Work 5 sc in MR. Rnd 2: sc in BLO around (5). Rnds 3–5: sc around (5). FO and sew the stem to the top center at a slight angle.
Acorns (make 4, 3.5 mm hook)
- Nut (cream), Rnd 1: 6 sc in MR. (6)
- Rnd 2: (Sc, inc) x3. (9)
- Rnd 3: (2 sc, inc) x3. (12)
- Rnd 4: (Sc, inc) x6. (18)
- Rnd 5: (2 sc, inc) x6. (24)
- Rnds 6–9: Sc around. (24)
- Rnd 10: (2 sc, dec) x6. (18) Stuff firmly.
- Rnd 11: (Sc, dec) x6. (12)
- Rnd 12: Dec x6. (6) FO and close.
- Cap (brown), Rnd 1: 6 sc in MR. (6)
- Rnd 2: Inc x6. (12)
- Rnd 3: (Sc, inc) x6. (18)
- Rnd 4: (2 sc, inc) x6. (24)
- Rnd 5: (3 sc, inc) x6. (30)
- Rnd 6: Sc in FLO around. (30)
- Rnd 7: Sc around. (30)
- Rnd 8: Sc in FLO around. (30) The FLO rounds give the cap its raised ridges.
- Rnd 9: (3 sc, dec) x6. (24) FO, leaving a long tail. Fit the cap over the wide end of the nut and whipstitch it around the edge.
Berries (3.5 mm hook)
- Make 16 cream, 14 burgundy, 10 mauve and 4 dusty pink.
- Rnd 1: 6 sc in MR. (6)
- Rnd 2: Inc x6. (12)
- Rnd 3: Sc around. (12)
- Rnd 4: Dec x6. (6) Stuff with a small pinch of fiberfill, FO and close. Leave a 20 cm tail on each berry for sewing.
Dangling Cords (cream, 3.5 mm hook)
- Berry cords (make 6): Ch 30 to 45, varying the length for each cord. Sl st in 2nd ch from hook and in each ch across. FO.
- Acorn cords (make 4): Ch 16 to 26. Sl st in 2nd ch from hook and in each ch across. FO. Sew one end of each cord to the top of an acorn cap.
- Sew 3 to 5 berries along each berry cord, with one berry at the end. Make 2 of these cords pink and cream to match the strands hanging from the bow.
Finishing
Lay the backing panel face up with the hanging loop at the top. Sew the large leaves first, fanning them around the outer edge so their tips extend 3 to 5 cm beyond the panel. Alternate the burgundy, pink and cream leaves so no two leaves of the same color touch. Add the small leaves in a second layer, placing more of them toward the lower half. Then tuck the corkscrew tendrils between the leaves, letting a few spring outward at the sides and bottom. Sew every piece through the plastic canvas. That way the weight sits on the panel rather than on the crochet fabric.
Place the large pumpkin centered in the upper half, about 12 cm below the top edge. Anchor it from the back with 8 to 10 stitches spaced around the flatter side, and work each stitch through the canvas. Sew the curled stem to the top of the pumpkin so it rises over the panel’s top edge. Next, sew the sunflower across the upper right of the pumpkin, overlapping its shoulder. Add the pink bloom to its upper left, the cream bloom at the far left and the small blossoms in the gaps. Group 3 to 5 burgundy and mauve berries into clusters beside the flowers.
Sew the second spiral center to the front of the pumpkin, slightly below the middle. Tie the jute twine into a bow and stitch it just under the spiral. Sew two pink-and-cream berry cords so they hang from the bow knot. Attach the mini pumpkins on the lower left and lower right. Then sew the acorn cords and the remaining berry cords along the bottom of the arrangement, staggering their lengths. Hang the piece on an over-door hook and adjust the drape of any leaves or tendrils by hand.
Tips for Success
- On the large pumpkin, stagger your increases and decreases from Rnd 6 onward. For example, start alternate rounds with half the sc count, then the inc. This keeps the 90-stitch sphere round instead of hexagonal, which shows badly once the ribs are wrapped.
- Pull all 8 rib wraps to the same tension before knotting. A quick check is to measure each segment’s width at the widest point with a tape measure; they should all be within half a centimeter of each other.
- Work the leaves, flowers and tendrils with the 4 mm hook and keep the amigurumi parts on 3.5 mm. The looser gauge lets the flat pieces lie and drape naturally, while the stuffed parts stay dense enough to hide the fiberfill.
- Block every leaf before assembly. Starched leaves hold their points and stay flat on the door. Unblocked cotton leaves tend to cup and curl after a few days of hanging.
- Sew rather than glue. Hot glue fails in cold weather on an exterior door, and stitching through the plastic canvas keeps a 400 g piece secure for years.
Common Mistakes to Avoid
- Overstuffing the large pumpkin. If it is packed too tightly, the rib wraps cannot sink in and the segments disappear. Stuff until it is firm but still gives slightly when pressed, then add a little more after wrapping if needed.
- Working the first petal round through both loops. If Rnd 7 of the sunflower (or Rnd 4 of the bloom) goes through both loops, no back loops remain for the second petal layer. Check that you are in the front loop only before starting each repeat.
- Leaves curling into a banana shape. This usually means the foundation chain was tighter than the stitches worked into it. Make the chain with a hook one size larger, then switch back for Rnd 1.
- The hanger tipping forward at the top. That happens when the pumpkin and stem are anchored only along their edges. Stitch the pumpkin through its back to the canvas in several places, and keep the hanging loop ends a few centimeters below the panel edge.
- Tendrils that won’t spiral. They need 3 sc in every chain; if you work only 2, they stay flat. If they twist too tightly, switch to 3 hdc instead.
Ways to Customize This Pattern
- Switch the palette to classic harvest colors: an orange pumpkin, golden-yellow sunflower petals and rust, gold and olive leaves.
- Make an all-neutral version in cream, oatmeal, taupe and brown for a farmhouse look that suits any front door.
- Turn it into a Halloween piece. Make the large pumpkin in charcoal or black, swap the sunflower for a second deep-plum bloom, and add a few little crochet bats on the cords.
- Make it a centerpiece instead of a door hanger. Skip the backing panel, add a flat 6-sc base to the bottom of the large pumpkin, and arrange the leaves and acorns around it on the table.
- Thread a battery-operated warm-white fairy light string through the tendrils and leaves for an evening glow. Tuck the battery pack behind the panel.
Frequently asked questions
Yes, as long as the door is under a covered porch. Cotton yarn absorbs moisture and can fade in direct sun. For a fully exposed door, use acrylic yarn and acrylic-safe fiberfill, and bring the hanger inside during heavy rain.
In worsted cotton it weighs roughly 400 to 450 g. A standard metal over-door wreath hook holds it easily. Avoid adhesive hooks, because the weight sits low on the piece and will pull them off over time.
It is strongly recommended. Without it, the pumpkin’s weight drags the center of the panel down and the bottom leaves bunch together. If you don’t have plastic canvas, a piece of stiff craft felt or thin foam board cut to the same size works as a substitute.
Yes. Use a 3 mm hook for the stuffed parts and a 3.5 mm hook for the flat parts, and follow every round exactly as written. The finished hanger will be about 75 to 80 percent of the original size, roughly 32 by 48 cm. It will also need a little less fiberfill.
The finished Autumn Pumpkin Door Hanger with 3D Sunflowers, Fall Leaves, Mini Pumpkins and Acorns