Willowbrook Garden Lace Table Runner Pattern
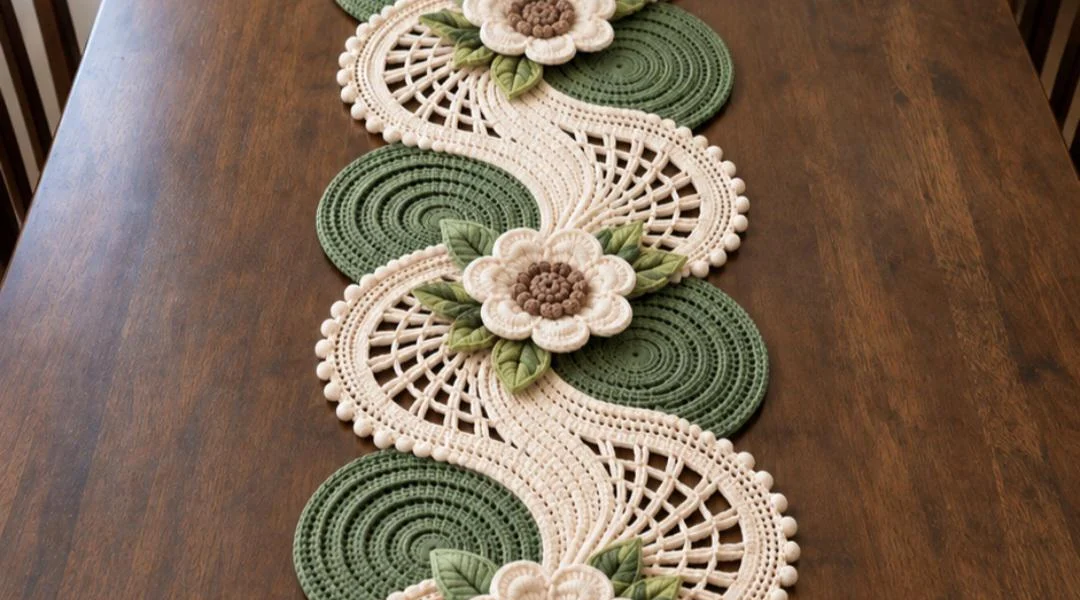
The Willowbrook Garden Lace Table Runner is built from an open, fan-shaped lace spine that curves down the table like a ribbon, punctuated by three dimensional layered flowers and framed by six solid moss-green medallions. It’s the kind of piece that looks like it came from a linen closet passed down through generations, but every curve is built from careful increase math and a scalloped pom-pom trim that takes real patience to get even.
This is not a quick weekend make. Between the lace spine, the six textured medallions, the three multi-layer flowers, and the leaves, expect 10-14 hours of hands-on time, plus blocking. It suits a confident intermediate-to-advanced crocheter who is comfortable reading charted lace repeats, working surface bobbles, and doing tidy invisible seaming — this is a “keep it forever” table centerpiece, not a beginner practice piece.
What makes it distinctive is the contrast between the airy, openwork spine and the dense, solid medallions sitting on either side of it. That push-and-pull between negative space and solid color is what gives the finished piece its movement on the table, and it’s also what makes the assembly step the most important part of the whole project.
Materials
- DK weight cotton yarn, cream/ecru ~250 g, for lace spine and flowers
- DK weight cotton yarn, moss green ~120 g, for medallions and leaves
- DK weight cotton yarn, soft brown ~15 g, for flower centers
- 3 mm crochet hook for the lace spine and edging
- 4 mm crochet hook for flowers, leaves, and medallions
- Tapestry needle for seaming and weaving ends
- Stitch markers to track round starts on medallions
- Fabric stiffener or spray starch, optional to help the lace spine hold its wave
- Rustproof pins and a blocking board for shaping the finished runner
Abbreviations
MRmagic ringchchainsl stslip stitchscsingle crochethdchalf double crochetdcdouble crochettrtreble crochetpicotch 3, sl st into first ch of the 3bobble5 tr worked into same stitch, drawn together into one loopskskipst(s)stitch(es)spspacereprepeatLace Spine (make 1, in one continuous piece)
- With 3 mm hook and cream, ch 8, join with sl st to form a ring.
- Round 1: ch 3 (counts as first dc), 15 dc into ring, join with sl st to top of ch 3. (16 dc)
- Round 2: ch 5 (counts as dc + ch 2), *sk 1 st, dc in next st, ch 2; rep from * around, join to 3rd ch of starting ch 5. (8 dc, 8 ch-2 sps)
- Round 3: sl st into first ch-2 sp, ch 3, (2 dc, ch 3, 3 dc) in same sp — this is your first shell, sk next dc, *(3 dc, ch 3, 3 dc) in next ch-2 sp, sk next dc; rep from * around, join. (8 shells)
- This 8-shell round is your medallion base — set aside. Repeat Rounds 1-4 five more times so you have 6 identical lace medallion bases total; these will become the wide “pulse points” of the wave.
- Now build the connecting lattice: with 3 mm hook and cream, join yarn in the ch-3 space of one medallion base, ch 12, sl st into corresponding ch-3 space of the next medallion base to form a bridge.
- Row 1 of bridge: ch 1, 14 sc evenly across the ch-12 bridge, turn.
- Row 2: ch 4, sk 1 sc, *dc in next sc, ch 1, sk 1 sc; rep from * across, ending dc in last sc, turn. (open mesh)
- Row 3: ch 1, sc in each dc and each ch-1 sp across, turn. (14 sc)
- Row 4: repeat Row 2, then fasten off.
- Repeat the bridge (Rounds 6-10) between each pair of medallion bases, curving each bridge gently to alternate left and right as you go so the finished spine reads as an S-curve rather than a straight line.
- Once all 6 medallion bases and 5 connecting bridges are joined into one continuous spine, work a final trim round around the entire outer edge: sc evenly around, working 3 sc into each outer point to keep the curve from puckering.
Pom-Pom Edging
- With 3 mm hook and cream, join yarn anywhere along the trim round from the previous section.
- *Sc in next 2 sts, then work a pom-pom stitch: yo, insert hook in same st, yo and pull up a long loop, yo, insert hook in same st again, yo and pull up another long loop, yo and draw through all loops on hook, ch 1 to close; rep from * around the entire outer edge of the spine.
- Join with sl st to first sc, fasten off, weave in ends.
- Steam the pom-pom edge lightly so the bobbles sit rounded and even rather than flattened.
Green Textured Medallions (make 6)
- With 4 mm hook and moss green, 6 sc in MR. (6 sts)
- Round 2: 2 sc in each st around. (12 sts)
- Round 3: *sc in next st, 2 sc in next st; rep from * around. (18 sts)
- Round 4: *sc in next 2 sts, 2 sc in next st; rep from * around. (24 sts)
- Round 5: *sc in next 3 sts, 2 sc in next st; rep from * around. (30 sts)
- Round 6: *sc in next 4 sts, 2 sc in next st; rep from * around. (36 sts)
- Round 7: *sc in next 5 sts, 2 sc in next st; rep from * around. (42 sts)
- Round 8: working in back loops only for a raised ridge, sc in each st around. (42 sts)
- Round 9: sc in each st around, both loops. (42 sts)
- Fasten off leaving a long tail, weave in the starting tail, and lightly steam flat. The back-loop round creates the concentric ridge line visible on the finished mat.
Layered Flowers (make 3)
- Flower center, in brown, with 4 mm hook: 6 sc in MR. (6 sts)
- Round 2: 2 sc in each st around, join with sl st, fasten off leaving a tail for attaching. (12 sts)
- Small petal layer, in cream: ch 4, join with sl st to form a ring.
- Round 1: ch 1, 8 sc into ring, join with sl st. (8 sts)
- Petal round: *(sl st, ch 2, 3 tr, ch 2, sl st) in next st — one petal made; rep from * in each of the remaining 7 sts. (8 petals)
- Fasten off, leaving a tail. Make one small petal layer per flower.
- Large petal layer, in cream: ch 6, join with sl st to form a ring.
- Round 1: ch 1, 12 sc into ring, join with sl st. (12 sts)
- Petal round: *(sl st, ch 3, 4 tr, ch 3, sl st) in next st — one petal made; rep from * in each of the remaining 11 sts. (12 petals)
- Fasten off, leaving a long tail for assembly. Make one large petal layer per flower.
- Stack the layers largest to smallest — large petal layer, then small petal layer, then the brown center — and sew through all layers from the back to secure. Make 3 complete flowers this way.
Leaves (make 6)
- With 4 mm hook and moss green, ch 9.
- Row 1: starting in 2nd ch from hook, sc, hdc, 3 dc, hdc, sc, sl st all in remaining chs up one side, then rotate and work sl st, sc, hdc, 3 dc, hdc, sc down the other side of the same starting chain. (leaf shape, pointed at both ends)
- Fasten off leaving a tail long enough to sew the leaf in place. Repeat to make 6 leaves total, 2 for each flower.
Finishing
Lay the completed lace spine down the center of your table first and steam-block it into its final S-curve, pinning the outer points if needed until it dries. Position one of the six green medallions on each side of every “pulse point” along the spine — you’ll use all 6 medallions across the 3 pulse points, with one medallion sitting on the left and one on the right at each point. Tack each medallion to the spine’s trim round with a few discreet stitches in matching thread so it stays put but can still lie flat.
Position a flower at the center of each of the three pulse points, angled so it sits slightly forward on the spine rather than dead center, then tuck two leaves behind each flower before sewing everything down through all layers. Weave in any remaining ends on the back, give the whole runner a final light steam, and let it lie flat until completely dry before moving it to the table.
Tips for Success
- Block the lace spine before attaching anything else — it’s much easier to shape an empty piece of lace than one already loaded with flowers and medallions.
- Use a slightly firmer tension on the bridge rows than you think you need; a loose mesh here makes the whole runner sag in the middle once it’s on the table.
- Sew the flower layers together from the back with the center layer facing you, so your stitching stays hidden on the finished front.
- Steam the pom-pom edging separately before final assembly — it’s much harder to reach evenly once the medallions are attached.
- Work all 6 medallions in the same lighting session if possible; subtle dye-lot shifts in green cotton show up more on solid mats than on the open lace.
Common Mistakes to Avoid
- Skipping the back-loop-only round on the medallions — this is what creates the visible ridge line, and working both loops there flattens the texture completely.
- Joining bridges without alternating the curve direction — if every bridge curves the same way, the spine spirals instead of waving, and it won’t lie flat.
- Using a single hook size throughout — the lace spine needs the smaller 3 mm hook to stay crisp; using 4 mm there makes the mesh too loose and floppy.
- Attaching flowers before blocking the spine — flowers sewn onto an unblocked spine will pull the lace out of shape once you finally steam it.
- Rushing the petal rounds — if the 3-tr or 4-tr groups aren’t pulled snug at the base, petals splay open instead of cupping, and the flower loses its layered look.
Ways to Customize This Pattern
- Swap the moss green medallions for a deep terracotta or dusty blue to match a different table setting.
- Reduce to 4 medallions and 2 flowers for a shorter runner suited to a small round table.
- Work the flower centers in gold thread instead of brown for a warmer, more autumnal look.
- Add a fourth, smaller petal layer to each flower in a contrasting cream shade for extra dimension.
- Skip the pom-pom edging in favor of a simple picot trim for a flatter, more minimalist finish.
Frequently asked questions
Will the lace spine lie flat on its own, or does it need to be pinned down?
Once blocked and steamed, the spine holds its wave shape well enough to sit flat, but a light spray starch on the openwork sections helps it keep that shape through repeated use and washing.
Can I make this runner narrower without changing the medallion count?
Yes — shorten the bridge chain in the connecting lattice section from 12 chains to 8, which pulls the medallions closer together and narrows the overall wave without removing any pieces.
My flowers look flat instead of layered — what went wrong?
This usually means the petal groups were worked too loosely. Tighten your tension on the treble crochet clusters in each petal, and make sure you’re stacking large-to-small before sewing so the smaller layer has room to cup forward.
What’s the best way to wash and store this once it’s finished?
Hand wash in cool water with a gentle detergent, reshape while damp, and dry flat on a towel. Store rolled rather than folded so the lace spine doesn’t develop permanent crease lines.
Leave a Reply